Gatsby Authentication With Strapi.io
May 14th 2020
Gatsby is a Static Site Generator (SSG) that is built on top of the popular React framework. It’s lightning fast because of the server side renders of JavaScript into static site files that are minified and can be served through a content delivery network. Since all of the pages in Gatsby are rendered as static content, user authentication to your Gatsby site can’t be performed on the server but must be protected through client side routing. This tutorial will walk you through setting up client side Authentication in Gatsby and how to manage logged in users in your Gatsby app.
All of the front-end files for our Gatsby Authentication tutorial can be found on the Github repository: https://github.com/hashinteractive/gatsby-authentication
Installing Gatsby Project
We’re going to start with a new Gatsby project for our authentication tutorial. Creating a new project is easy with npx. We can open up our terminal and run the command:
gatsby new gatsby-authenticationOnce we are done installing our gatsby sitte we can make sure it’s running by navigating into the gatsby-authentication folder and running yarn develop. You should see the development server available at http://localhost:8000/.
Gatsby Application Structure
The structure of our app is going to be a mix of public pages that are statically generated during gatsby build and also a number of private components that will all live within the namespace of http://localhost:8000/app. We will also have a public login page at http://localhost:8000/login that will contain the login component to handle our authentication. As mentioned before we are going to be creating client only routes that are conditionally rendered using the @reach/router in our /app namespace. Private components that we will be included on our /app page will be the Dashboard.js component and the Account.js component which will be accessed at the routes /app and /app/account respectively. The content in these private components are irrelevant but it’s important that the user must me logged in to access these two routes.
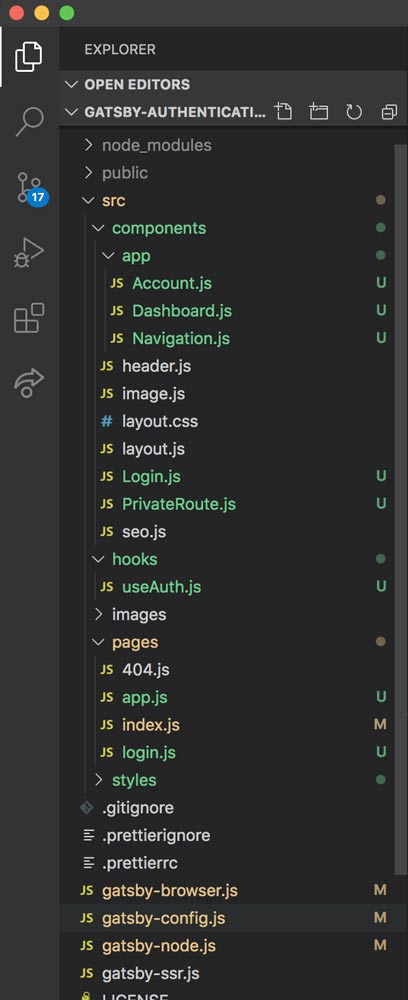
Most of our Authentication logic will be handled in a custom hook that we create which will be called useAuth and as the name implies will live inside the file useAuth.js in our hooks folder. This file will be utilizing the Context API to manage our user state throughout the application. Let’s start by creating our app page with client only routes that will render the child components Dashboard.js and Account.js in our project.
Gatsby Client Only Routes
First, we’re going to create a page in our ./src/pages/ folder called app.js which will import our components and use a helper from the @reach/router library to handle client only dynamic routing. Create the file in ./src/pages/app.js which will look like:
import React from "react"
import { Router } from "@reach/router"
import Layout from "../components/layout"
import Navigation from "../components/app/Navigation"
import Dashboard from "../components/app/Dashboard"
import Account from "../components/app/Account"

const App = ({ location }) => {
  const redirect = location.pathname.split('/').pop()

  return (
    <Layout>
      <Navigation />
      <Router basepath="/app">
        <Account path="/account" />
        <Dashboard default />
      </Router>
    </Layout>
  )
}
export default App
We are destructuring the location variable which is provided in Gatsby pages/routes by @reach/router and contains a pathname property that is the path in our url. Since the app.js page will handle all routes in our application that start with “app” ie /^\/app/ we will be using the redirect variable above to redirect the user back to the appropriate private route after login.
As mentioned earlier we are using a <Router> component from the @reach/router library so handle client only dynamic routing. We are also setting our <Dashboard> components as the default route so once we land on just the /app route our Dashboard will be the default component that is rendered.
Briefly, when a page loads, Reach Router looks at the
gatsbyjs.org/docspathprop of each component nested under<Router />, and chooses one to render that best matcheswindow.location. In the case of the/app/accountpath, theAccountcomponent will be rendered, as its prefix matches the base path of/app, and the remaining part is identical to the child’s path.
Our Dashboard and Account components are simple just to demonstrate the authorization model (you will soon have to be logged in to use them). We also developed a Navigation component that will be navigation between our /app routes. Here are our private components:
Dashboard.js
import React from 'react'

const Dashboard = () => (
  <>
    <h1>Dashboard</h1>
    <p>This is a protected Dashboard</p>
  </>
)

export default Dashboard
Account.js
import React from 'react'

const Account = () => (
  <>
    <h1>Account Page</h1>
    <p>This is another protected Account page</p>
  </>
)

export default Account
Navigation.js
import React from 'react'
import { Link } from 'gatsby'

export default () => (
  <ul class="flex">
    <li class="mx-2 px-2"><Link to="/app">Dashboard</Link></li>
    <li class="mx-2 px-2"><Link to="/app/account">Account</Link></li>
  </ul>
)
Now we have to tell Gatsby that all pages rendered under the /app namespace should be served the app.js file (or what would be the static site version once compiled at build time found at ./app/index.html). This way instead of throwing a 404 not found error for /app/account route, Gatsby knows that it must serve the app.js page and the @reach/router will take over to display the relevant component. In order to tell Gatsby to serve all routes that start with /app to the app.js page we will need to open (or create) the file gatsby-node.js at the root of our gatsby-authentication project and hook into exports.onCreatePage hook:
// Implement the Gatsby API “onCreatePage”. This is
// called after every page is created.
exports.onCreatePage = async ({ page, actions }) => {
  const { createPage } = actions
  // page.matchPath is a special key that's used for matching pages
  // only on the client.
  if (page.path.match(/^\/app/)) {
    page.matchPath = "/app/*"
    // Update the page.
    createPage(page)
  }
}
The page.matchPath is a key that resolves front-end pages created in Gatsby:
matchPath
Think of this instead as
client matchPath. It is ignored when creating pages during the build. But on the frontend, when resolving the page from the path (find-path.js), it is used (via reach router) to find the matching page. Note that the pages are sorted so that those with matchPaths are at the end, so that explicit paths are matched first.It duplicates pages whose path match some client-only prefix (e.g.
https://www.gatsbyjs.org/docs/gatsby-internals-terminology/#matchpath/app/). The duplicated page has amatchPathso that it is resolved first on the frontend.
Now once we restart our Gatsby development server we should be able to navigate to http://localhost:8000/app and we will be able to see our Dashboard component which is the default rendered component and we can navigate between the Dashboard and Account components with our Navigation component that we defined. We haven’t protected the /app route(s) so let’s turn our attention to how to protect these routes through our authentication.
Using React’s Context API in Gatsby
In order to manage the state of our user at a global level throughout our Gatsby site we will implement the React Context API and wrap the Gatsby root element in our Context provider to ensure that our Context value will be available to all of our consuming components in our app. If you are not familiar with the React Context API you can browse through our recent article: Understanding React Context API.
We will create a folder in our project directory at ./src/hooks and inside that folder create a file called useAuth.js. This is the file that will export a custom hook and our Context Provider to help us manage and consume state. We will also be using a reducer to receive our state object and update our state by dispatching actions. Let’s walk through our useAuth.js file:
import React, { createContext, useContext, useReducer } from 'react'
import axios from 'axios'
const apiURL = process.env.GATSBY_API_URL

const DEFAULT_STATE = {
  jwt: null,
  user: {},
  loggedIn: false
}

const reducer = (state, action) => {
  switch(action.type){
    case 'LOGIN':
      const { jwt = null, user = {} } = action.payload
      return {...state, jwt, user, loggedIn: true}
    case: 'LOGOUT':
      return {...state, jwt: null, user: {}, loggedIn: false}
    default:
      return DEFAULT_STATE
  }
}

const AuthContext = createContext()

const AuthProvider = ({ children }) => {
  <AuthContext.Provider value={useReducer(reducer, DEFAULT_STATE)}>
    {children}
  </AuthContext.Provider>
}

export const wrapRootElement = ({element}) => (
  <AuthProvider>
    {element}
  </AuthProvider>
)

const useAuth = () => {
  const [state, dispatcher] = useContext(AuthContext)
  const isAuthenticated = state.loggedIn && Object.keys(state.user).length

  const login = async (credentials) => new Promise(async(resolve, reject) => {
    try{
      const { data: payload } = await axios.post(`${apiURL}/auth/local`, credentials)
      dispatcher({ type: 'LOGIN', payload })
      resolve(payload)
    }
    catch(e){
      console.log(e)
      reject(e)
    }
  })
  const logout = () => {
    dispatcher({ type: 'LOGOUT' })
  }

  return { state, isAuthenticated, login, logout }
}

export default useAuth
We will also need to create a file in the root of our directory called .env.development and inside will put our GATSBY_API_URL so we can access that in our useAuth.js file:
GATSBY_API_URL="http://localhost:1337"There is a lot going on in this file so let’s walk through it. First, we are importing some helpers from React including createContext, useContext and useReducer. We are also installing the axios library. First, we’re defining our DEFAULT_STATE which we are assuming is an unauthenticated user. We’re then creating a reducer using the redux convention and we’re switching our action.type so when we call a dispatcher function we can pass in the type of action we want to execute. We’re then defining two action types. First, is our LOGIN action which we pass our action payload that will contain our jwt, user and we’re setting loggedIn to true. The second action type is our LOGOUT action which resets the user to an unauthenticated user.
Next, we’re creating a context object that we’re assigning to AuthContext. After that we have access to AuthContext.Provider component so we’re creating a special Provider component called <AuthProvider> and using our AuthContext.Provider we’re wrapping any children props that our provider receives. We’re also setting the value of our provider to the returned value of useReducer which is a [state, dispatcher] array. We’re initializing the value of our returned state to be DEFAULT_STATE assuming that the user is logged out. We are then using our custom component <AuthProvider> and we’re exporting a const called wrapRootElement which is a special variable in Gatsby that whatever is returned is used to wrap the root render element of our mounted Gatsby app. This will ensure that all components “down stream” from our root element are a consumer of our AuthContext and have the ability to access our context value. We will have to add a line to our gatsby-browser.js file to export the wrapRootElement function we defined but we’ll do that in the next step.
Finally, we are defining our custom hook useAuth which will be the default export for our file. We’re first getting the context value by using useContext which is an array containing our state and our dispatcher function to dispatch an action to our reducer. We are then defining some helper functions/variables. The isAuthenticated variable checks if our user is authenticated and exists in our state. The login function we will be exporting from the useAuth hook and will handle login. Likewise, the logout function just uses the dispatcher to dispatch a LOGOUT action which clears our state. Finally, we’re exporting our state returned from our reducer, and our helpers: isAuthenticated, login and logout.
Gatsby wrapRootElement
In order for all of our components in our app to become a context consumer we need to wrap our custom <AuthProvider> component around the gatsby root element. We created a helper functional wrapRootElement component in our useAuth.js file that exported our <AuthProvider> component wrapped around the { element } prop that will be passed in to our wrapRootElement function. All we need to do now is use gatsby-browser.js to import (and immediately export) our wrapRootElement function. Open gatsby-browser.js in the project directory and add:
export { wrapRootElement } from './src/hooks/useAuth'This is useful to set up any Provider components that will wrap your application.
https://www.gatsbyjs.org/docs/browser-apis/#wrapRootElement
If you are using the command gatsby build you will need to enable server side rendering for your wrapRootElement as well so that the AuthContext is available on the server render as well as client side. In order to allow this we will need to create another file in our root directory called gatsby-ssr.js and add the same logic as our gatsby-browser.js file:
export { wrapRootElement } from './src/hooks/useAuth'Strapi Authentication
Using Strapi.io we have the user roles and permissions plugin installed and at our disposal. The users and permissions role exposes a route to us located at http://localhost:1337/auth/local in which we can send a POST request with our users identity and password. The route will handle validation and upon successful authentication will return a jwt token to be used in further requests as well as a user object that contains information about our validated user.
Submit the user’s identifier and password credentials for authentication. When the authentication is successful, the response data returned will have the user’s information along with a jwt authentication token.
https://strapi.io/documentation/3.0.0-beta.x/plugins/users-permissions.html#login
For our front-end app to work you will have to create a new user in your strapi installation and you can create the user with the default role Authenticated since we are not defining any other roles at this time. You can not use your admin username/password with this endpoint.
Protecting our Gatsby App
Now with our useAuth hook defined we can turn our attention back to our app.js file that will handle the client side authentication check. Remember our current file is using @reach/router to define client-only routes that will be conditionally rendered depending on the route. However, we have not written any logic to protect these routes. Let’s change that by using our new useAuth hook to check if our user is logged in, otherwise we’ll redirect them to the login.js page:
import React, { useEffect } from "react"
import { navigate } from "gatsby"
import { Router } from "@reach/router"
import Layout from "../components/layout"
import Navigation from "../components/app/Navigation"
import Dashboard from "../components/app/Dashboard"
import Account from "../components/app/Account"
import useAuth from "../hooks/useAuth"

const App = ({ location }) => {
  const { state, isAuthenticated } = useAuth()
  const redirect = location.pathname.split('/').pop()
  useEffect(() => {
    if (!isAuthenticated) {
      navigate('/login', { state: { redirect }});
    }
  }, [isAuthenticated, redirect]);

  return (
    <Layout>
      <pre>
        { JSON.stringify(state, null, 2) }
      </pre>
      <Navigation />
      <Router basepath="/app">
        <Account path="/account" />
        <Dashboard default />
      </Router>
    </Layout>
  )
}
export default App
All of the logic to protect our /app routes is done in:
  const { state, isAuthenticated } = useAuth()
  const redirect = location.pathname.split('/').pop()
  useEffect(() => {
    if (!isAuthenticated) {
      navigate('/login', { state: { redirect }});
    }
  }, [isAuthenticated, redirect]);
We are first destructuring our state object and our isAuthenticated helper from our useAuth hook. We are using the useEffect hook to “listen” for changes in our isAuthenticated and redirect variables and the callback checks if the user is not authenticated !isAuthenticated then we redirect the user to the /login route, passing in our redirect variable as a state property so we can access that once we log our user in. To test this out we can start our gatsby development server with yarn develop and we can navigate to http://localhost:8000/app and since we’re initializing our state to DEFAULT_STATE of a unauthenticated user our isAuthenticated is false and we should be redirected to http://localhost:8000/login route. Now with our /app routes protected we can look at our login.js page and our Login.js component that handles the login functionality.
Gatsby Login Component
First, we’ll create a page in ./src/pages/login.js so gatsby will automatically create a page route for us at http://localhost:8000/login. This will be a simple page that will import our <Login> component which will handle our functionality. In our ./src/pages/login.js file we can add:
import React from "react"
import { Link } from "gatsby"
import Login from '../components/Login'

import Layout from "../components/layout"

const LoginPage = ({ location }) => {
  const { state: routeState } = location
  const redirect = !routeState
    ? '/app'
    : routeState.redirect === 'app'
      ? '/app'
      : `/app/${routeState.redirect}`

  return (
    <Layout>
      <h1>Login</h1>
      <p>Please use your credentials to login</p>
      <div>
        <Login redirect={redirect} />
      </div>
      <Link to="/">Go to Home Page</Link>
    </Layout>
  )
}

export default LoginPage
We are receiving the location prop that is passed provided from @reach/router and in which we set our state variable in from our ./app.js page when we navigated the user here. We’re checking if the state in our location object is set and if not we’re going to redirect to /app otherwise we’re redirecting to location the user came from ie /app/account. This is more for convenience to return the user to the expected route. We’re then importing the <Login> component and passing our redirect prop to the component. Let’s look at our <Login> component as that will handle the login functionality for our gatsby authentication. In ./src/components/Login.js we can add:
import React, { useState } from 'react'
import { navigate } from 'gatsby'
import useAuth from '../hooks/useAuth'
const Login = ({ redirect }) => {
const { state, login } = useAuth()
const [identifier, setIdentifier] = useState('')
const [password, setPassword] = useState('')
const [error, setError] = useState('')
const handleSubmit = async (event) => {
event.preventDefault()
try{
await login({ identifier, password })
navigate(redirect)
}catch(e){
console.log("Error occurred during authentication")
const { response: { data: { message: [{ messages: [error]}] } } } = e
const { message: msg } = error
setError(msg)
}
}
return (
<div className="w-full max-w-xs">
<pre>
{ JSON.stringify({ state }, null, 2)}
</pre>
<form
onSubmit={handleSubmit}
className="bg-white shadow-md rounded px-8 pt-6 pb-8 mb-4">
<div className="mb-4">
<label className="block text-gray-700 text-sm font-bold mb-2" htmlFor="username">
Username
</label>
<input
onChange={ e => {
setIdentifier(e.target.value)
}}
value={ identifier }
className="shadow appearance-none border rounded w-full py-2 px-3 text-gray-700 leading-tight focus:outline-none focus:shadow-outline" id="username" type="text" placeholder="Username" />
</div>
<div className="mb-6">
<label className="block text-gray-700 text-sm font-bold mb-2" htmlFor="password">
Password
</label>
<input
onChange={ e => {
setPassword(e.target.value)
}}
value={ password }
className="shadow appearance-none border border rounded w-full py-2 px-3 text-gray-700 leading-tight focus:outline-none focus:shadow-outline" id="password" type="password" placeholder="******************" />
</div>
<div className="flex items-center justify-between">
<button type="submit" className="bg-blue-500 hover:bg-blue-700 text-white font-bold py-2 px-4 rounded focus:outline-none focus:shadow-outline">
Sign In
</button>
</div>
</form>
{ (error.length > 1) && (
<p className="text-center text-red-500 bg-red-200 border p-2">
{ error }
</p>
)}
<p className="text-center text-gray-500 text-xs">
©2020 Gatsby Authentication. All rights reserved.
</p>
</div>
)
}
export default LoginRemember, our strapi login endpoint http://localhost:1337/auth/local expects POST body with properties identifier and password. In our form we’re using the useState hooks provided by React to manage the users input and set the variables identifier and password. Once the form is submitted we’re calling handleSubmit which internally prevents the default browser form from being submitted and instead calls our login helper function we imported from useAuth hook. This is the function that makes the call to our strapi endpoint to validate the user. Since we’re returning a promise in our login helper we can await the function to resolve and run a try/catch block to make sure there are no errors. If there are errors we’re logging the error message to the form. If the login function resolves correctly as expected than our state in our AuthContext is set and we are able to navigate the user to the redirect route in our /app namespace. We can validate that it is working by going to http://localhost:8000/login and entering the username and password we created in our strapi installation. Remember, the user in our strapi install can not be an admin user as we have to create a separate user for authentication to the /auth/local endpoint.
Summary
With everything working you should be directed back to the /app route and you should see that the information in our state is being logged and you can see the Dashboard and Account routes:
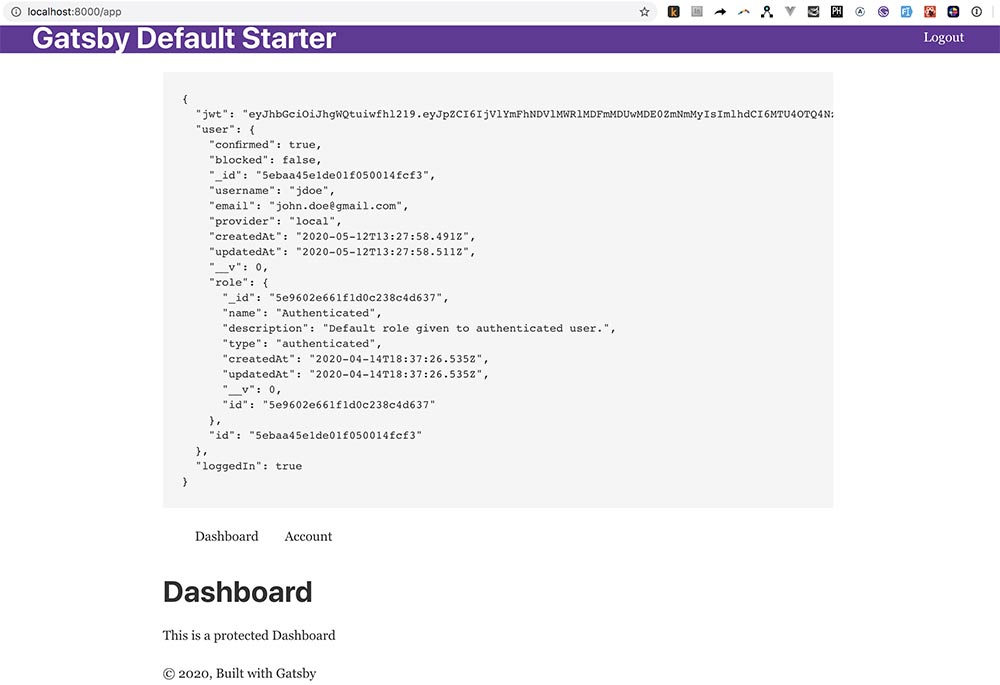
We have successfully implemented login functionality for our Gatsby app using Strapi.io as our authentication provider!
Bonus
If you remember, we defined a logout helper function in our useAuth hook. We can implement that in the header.js component in our Gatsby project such that our header file will look like:
import { Link } from "gatsby"
import PropTypes from "prop-types"
import React from "react"
import useAuth from "../hooks/useAuth"

const Header = ({ siteTitle }) => {
  const { logout, isAuthenticated } = useAuth()
  const handleLogout = (e) => {
    e.preventDefault()
    logout()
  }

  return (
    <header
      style={{
        background: `rebeccapurple`,
        marginBottom: `1.45rem`,
      }}
    >
      <div className="container mx-auto">
        <div className="flex justify-between items-center">
          <div className="w-1/2">
            <h1 className="m-0">
              <Link
                to="/"
                style={{
                  color: `white`,
                  textDecoration: `none`,
                }}
              >
                {siteTitle}
              </Link>
            </h1>
          </div>
          <div className="w-1/2 text-right">
            { isAuthenticated
              ? (
                  <a
                    onClick={handleLogout}
                    className="text-white"
                    href="/">
                    Logout
                  </a>
                )
              : (
                <Link
                  to="/login"
                  className="text-white">
                    Login
                  </Link>
                )
            }
          </div>
        </div>
      </div>
    </header>
  )
}

Header.propTypes = {
  siteTitle: PropTypes.string,
}

Header.defaultProps = {
  siteTitle: ``,
}

export default Header
This will show either the Login link or the Logout link depending on the state of isAuthenticated variable!
All of the front-end files for our Gatsby project can be found on the Github repository: https://github.com/hashinteractive/gatsby-authentication