How to Create Your Own Gatsby.js Theme Part One
March 25th 2020
This tutorial is segmented into two parts. Part One discusses setting up the Yarn Workspace that we will use for development purposes. We will setup our data source using Gatsby’s filesystem source plugin and transform JSON data using Gatsby’s transform json plugin. Part Two we will discuss extending the theme and using it as a package dependency. We will include styling options use Theme UI and discuss how we can override our theme styles and theme components using component shadowing.
Gatsby.js is a wonderful static site generator that is built on top of React. There are many large websites that use Gatsby as their front-end of choice because of the performance benefits of the platform. Gatsby really shines when it comes to speed and security since all of the pages are generated at build time and minified for the optimal page size and delivery.
A Gatsby theme is a module dependency (just like any other node dependency) which can be written to configure Gatsby and provide functionality to any project that wants to use (or extend) the theme. In this tutorial we’ll walk through the process of creating a Gatsby theme which you can publish and distribute for others to use.
Yarn Workspace Setup
Since we’ll be building out a Gatsby theme we will use yarn workspaces to create the theme and also setup a new Gatsby project that will depend on the theme in the other workspace. One benefit of yarn workspaces is that they can have a dependency on one another:
Your dependencies can be linked together, which means that your workspaces can depend on one another while always using the most up-to-date code available. This is also a better mechanism than
https://classic.yarnpkg.com/en/docs/workspaces/yarn linksince it only affects your workspace tree rather than your whole system.
We’ll first create an empty folder that will hold both workspaces we’re about to create. Navigate to a place on your computer where you want to setup the project and run mkdir gatsby-theme-builder-tutorial which is our parent project folder. Change directories into the new folder we created and create a package.json file. You can open the package.json in your editor of choice and add:
{
  "private": true,
  "workspaces": ["gatsby-theme-portfolio", "test-site"]
}
We’re creating two workspaces here: gatsby-theme-portfolio and test-site in which we’ll use to develop our theme. The private: true ensures that we won’t publish the parent theme as we will only be publishing the gatsby-theme-portfolio project to npm. We will need to create the two folders for our workspaces: mkdir gatsby-theme-portfolio && mkdir test-site. Now we will have to create separate package.json files for each of these folders. We’ll start with the package.json file in the gatsby-theme-portfolio folder:
{
  "name": "gatsby-theme-portfolio",
  "version": "1.0.0",
  "main": "index.js",
  "license": "MIT",
  "scripts": {
    "build": "gatsby build",
    "clean": "gatsby clean",
    "develop": "gatsby develop"
  }
}
The "name" corresponds to the yarn workspace you defined earlier, in the root-level package.json file which was gatsby-theme-portfolio. As you can see we are required to create a "main": "index.js" file since this is a package that is going to be published to npm. This can be a blank file with some comments:
// silenceNow we can go over to our other workspace test-site and create a similar package.json file:
{
  "private": true,
  "name": "test-site",
  "version": "1.0.0",
  "license": "MIT",
  "scripts": {
    "build": "gatsby build",
    "develop": "gatsby develop",
    "clean": "gatsby clean"
  }
}
We are going to set "private": "true" in this package.json file as well since we won’t be publishing the test-site project but rather we’ll be using it to test our theme dependency. We can also add our dependency requirements to our test-site workspace. Change directories into the main root folder gatsby-theme-builder-tutorial and run:
yarn workspace test-site add gatsby react react-dom gatsby-theme-portfolio@*We are creating a dependency for our test-site to our other workspace gatsby-theme-portfolio. We can verify this by running yarn workspaces info
{
  "gatsby-theme-portfolio": {
    "location": "gatsby-theme-portfolio",
    "workspaceDependencies": [],
    "mismatchedWorkspaceDependencies": []
  },
  "test-site": {
    "location": "test-site",
    "workspaceDependencies": [
      "gatsby-theme-portfolio"
    ],
    "mismatchedWorkspaceDependencies": []
  }
}
You can see under our “test-site” under “workspaceDependencies” we have a dependency on our other workspace! Since other projects will be consuming our gatsby-theme-portfolio and since they are gatsby projects they will need the same dependencies we just downloaded: gatsby react react-dom so we will need to add these as peerDependencies to our gatsby-theme-portfolio by running yarn workspace gatsby-theme-portfolio add -P gatsby react react-dom and also since we are going to be using this project to develop our Gatsby theme with we will need to install these as devDependencies too: yarn workspace gatsby-theme-portfolio add -D gatsby react react-dom. Our package.json file in our gatsby-theme-portfolio should look like:
{
  "name": "gatsby-theme-portfolio",
  "version": "1.0.0",
  "main": "index.js",
  "license": "MIT",
  "scripts": {
    "build": "gatsby build",
    "clean": "gatsby clean",
    "develop": "gatsby develop"
  },
  "peerDependencies": {
    "gatsby": "^2.20.4",
    "react": "^16.13.1",
    "react-dom": "^16.13.1"
  },
  "devDependencies": {
    "gatsby": "^2.20.4",
    "react": "^16.13.1",
    "react-dom": "^16.13.1"
  }
}
Now with the setup in place we can run both the test-site and the gatsby-theme-portfolio projects to make sure they are working as expected:
yarn workspace test-site run develop
yarn workspace gatsby-theme-portfolio run develop
With both of those working we can move on to the fun part building out the theme!
Developing Your Gatsby Theme
In this tutorial we will be using gatsby-source-filesystem plugin to source the files in the project into nodes and we will also be using the transformer plugin gatsby-transformer-json plugin to transform .json files into GraphQL nodes as well. Let’s install these dependencies:
yarn workspace gatsby-theme-portfolio add gatsby-source-filesystem gatsby-transformer-jsonNow with those installed we can create a gatsby-config.js file inside of our gatsby-theme-portfolio folder to define our plugins:
module.exports = {
  plugins: [
    {
      resolve: `gatsby-source-filesystem`,
      options: {
        path: `./src/data`,
      },
    },
     {
      resolve: `gatsby-transformer-json`,
      options: {
        typeName: ({ node }) => node.name
      },
    },
  ],
}
In this file we are setting some configuration options. The first option in gatsby-source-filesystem is the path that we want our data files sourced from which is going to be src/data folder (which we will create in a bit). The second option in gatsby-transformer-json is the typeName which will be used for our GraphQL Type definitions. We are using the node.name which is going to be the name of the .json file we create. For instance, if we create a file that will hold all of our projects called: src/data/Project.json the GraphQL type will be Project and in our GraphQL query we can use the GraphQL query:
query{
  allProject{}
}
And this will return all of our projects which are defined in the Project.json file. Before we forget let’s create the folders: src/data in our gatsby-theme-portfolio workspace and we can add the file Project.json. Since this will be a list of projects we can define the file as such:
[
  {
    "name": "My Gatsby Project",
    "url": "https://github.com/hashinteractive/gatsby-theme-reactor/tree/master/gatsby-theme-reactor",
    "technologies": ["react.js", "gatsby.js", "GraphQL", "Tailwind CSS"]
  },
  {
    "name": "My Second Project",
    "url": "https://github.com/hashinteractive/gatsby-theme-reactor/tree/master/gatsby-theme-reactor",
    "technologies": ["vue.js", "nuxt.js", "GraphQL", "Tailwind CSS"]
  }
]
Now that we have those defined we can run gatsby develop in our workspace:
yarn workspace gatsby-theme-portfolio run developAnd we can open up or GraphiQL explorer and run:
{
  allProject {
    edges {
      node {
        name
        technologies
        url
      }
    }
  }
}
And we should see
{
  "data": {
    "allProject": {
      "edges": [
        {
          "node": {
            "name": "My Gatsby Project",
            "technologies": [
              "react.js",
              "gatsby.js",
              "GraphQL",
              "Tailwind CSS"
            ],
            "url": "https://github.com/hashinteractive/gatsby-theme-reactor/tree/master/gatsby-theme-reactor"
          }
        },
        {
          "node": {
            "name": "My Second Project",
            "technologies": [
              "vue.js",
              "nuxt.js",
              "GraphQL",
              "Tailwind CSS"
            ],
            "url": "https://github.com/hashinteractive/gatsby-theme-reactor/tree/master/gatsby-theme-reactor"
          }
        }
      ]
    }
  }
}
Working as expected! Great, now we have some data to work with. But we will need to take into consideration that the sites using our theme might not have the src/data/Project.json folder structure so let’s run some test to make sure they do!
Create a data directory using the onPreBootstrap lifecycle
We can use the the lifecycle api onPreBootstrap to make sure our folder structure is correct. We can run this hook in gatsby-node.js file. Let’s create that file in our gatsby-theme-portfolio project folder:
const fs = require("fs")
// Make sure the src/data directory exists
exports.onPreBootstrap = ({ reporter }) => {
  const dataPath = "src/data"
  if (!fs.existsSync(dataPath)) {
    reporter.info(`creating the ${dataPath} directory`)
    fs.mkdirSync(dataPath)
  }
}
We’re requiring the fs node package to create the folder structure src/data if it does not exist.
Manipulating GraphQL Type Definitions
Since we know we have a GrapQL Type Project we can manipulate the type definition (which is created by gatsby-tranformer-json plugin to add fields to our type definition. The first field we’re going to add is the slug field which we will define later as a custom resolver. We can do this by hooking into the sourceNodes api in which we can use the createTypes action to manipulate the Project type. Open up gatsby-theme-portfolio/gatsby-node.js and add a new line:
const fs = require("fs")
// Make sure the src/data directory exists
exports.onPreBootstrap = ({ reporter }) => {
  const dataPath = "src/data"
  if (!fs.existsSync(dataPath)) {
    reporter.info(`creating the ${dataPath} directory`)
    fs.mkdirSync(dataPath)
  }
}

exports.sourceNodes = ({ actions }) => {
  const { createTypes } = actions
  const typeDefs = `
    type Project implements Node {
      slug: String!
    }
  `
  createTypes(typeDefs)
}
We will allow Gatsby to automatically infer type definitions for the other fields in our Project.json file, but the slug field we can define in addition to the other fields. Now that we have it defined as type String! we will need to create a custom resolver to resolve the field value. We can do this using Gatsby’s createResolvers API.
We are going to use the createResolver API to resolve our slugify field which we will pass the field name of the Project and slugify it with this handy helper function you can find on Medium:
function slugify(string) {
  const a = 'àáâäæãåāăąçćčđďèéêëēėęěğǵḧîïíīįìłḿñńǹňôöòóœøōõőṕŕřßśšşșťțûüùúūǘůűųẃẍÿýžźż·/_,:;'
  const b = 'aaaaaaaaaacccddeeeeeeeegghiiiiiilmnnnnoooooooooprrsssssttuuuuuuuuuwxyyzzz------'
  const p = new RegExp(a.split('').join('|'), 'g')

  return string.toString().toLowerCase()
    .replace(/\s+/g, '-') // Replace spaces with -
    .replace(p, c => b.charAt(a.indexOf(c))) // Replace special characters
    .replace(/&/g, '-and-') // Replace & with 'and'
    .replace(/[^\w\-]+/g, '') // Remove all non-word characters
    .replace(/\-\-+/g, '-') // Replace multiple - with single -
    .replace(/^-+/, '') // Trim - from start of text
    .replace(/-+$/, '') // Trim - from end of text
}
Now back to our gatsby-node.js file for our createResolvers definition. We can add our definition in the exports.createResolvers lifecycle api that gatsby provides in our gatsby-node.js file:
const fs = require("fs")
// Make sure the src/data directory exists
exports.onPreBootstrap = ({ reporter }) => {
  const dataPath = "src/data"
  if (!fs.existsSync(dataPath)) {
    reporter.info(`creating the ${dataPath} directory`)
    fs.mkdirSync(dataPath)
  }
}

exports.sourceNodes = ({ actions }) => {
  const { createTypes } = actions
  const typeDefs = `
    type Project implements Node {
      slug: String!
    }
  `
  createTypes(typeDefs)
}

exports.createResolvers = ({ createResolvers }) => {
  const resolveSlug = (source) => {
    const a = 'àáâäæãåāăąçćčđďèéêëēėęěğǵḧîïíīįìłḿñńǹňôöòóœøōõőṕŕřßśšşșťțûüùúūǘůűųẃẍÿýžźż·/_,:;'
    const b = 'aaaaaaaaaacccddeeeeeeeegghiiiiiilmnnnnoooooooooprrsssssttuuuuuuuuuwxyyzzz------'
    const p = new RegExp(a.split('').join('|'), 'g')

    const slugify = string => string.toString().toLowerCase()
      .replace(/\s+/g, '-')
      .replace(p, c => b.charAt(a.indexOf(c)))
      .replace(/&/g, '-and-')
      .replace(/[^\w\-]+/g, '')
      .replace(/\-\-+/g, '-')
      .replace(/^-+/, '')
      .replace(/-+$/, '')

    const slug = slugify(source.name)
    const basename = slugify(source.internal.type)

    return `/${basename}/${slug}`
  }

  createResolvers({
    Project: {
      slug: {
        resolve: source => resolveSlug(source),
      },
    },
  })
}
Now when we run our development server: yarn workspace gatsby-theme-portfolio run develop and navigate to http://localhost:8000/___graphql we can see that our query:
{
  allProject {
    edges {
      node {
        name
        technologies
        url
        slug
      }
    }
  }
}
Returns us our slug field such that:
{
  "data": {
    "allProject": {
      "edges": [
        {
          "node": {
            "slug": "/project/my-gatsby-project"
          }
        },
        {
          "node": {
            "slug": "/project/my-second-project"
          }
        }
      ]
    }
  }
}
We can now use this field in our createPages lifecycle api (which we will define in a bit) to create custom pages for each project specifying the template and the path (slug). Each project will get it’s own page at the route/path of /project/project-name-slug. Let’s take a look at our createPages which allows us to create pages and pass in context object to define what the content should be for that page. We will do this in our gatsby-theme-portfolio/gatsby-node.js file. First, we are going to be making a graphql query to get all of our Project nodes that we have defined in our /src/data/Project.json file and then we will loop over all of the returned nodes and use the createPage action to define a project page. Let’s take a look at what that looks like:
const fs = require("fs")
// Make sure the src/data directory exists
exports.onPreBootstrap = ({ reporter }) => {
  const dataPath = "src/data"
  if (!fs.existsSync(dataPath)) {
    reporter.info(`creating the ${dataPath} directory`)
    fs.mkdirSync(dataPath)
  }
}

exports.sourceNodes = ({ actions }) => {
  const { createTypes } = actions
  const typeDefs = `
    type Project implements Node {
      slug: String!
    }
  `
  createTypes(typeDefs)
}

exports.createResolvers = ({ createResolvers }) => {
  const resolveSlug = (source) => {
    const a = 'àáâäæãåāăąçćčđďèéêëēėęěğǵḧîïíīįìłḿñńǹňôöòóœøōõőṕŕřßśšşșťțûüùúūǘůűųẃẍÿýžźż·/_,:;'
    const b = 'aaaaaaaaaacccddeeeeeeeegghiiiiiilmnnnnoooooooooprrsssssttuuuuuuuuuwxyyzzz------'
    const p = new RegExp(a.split('').join('|'), 'g')

    const slugify = string => string.toString().toLowerCase()
      .replace(/\s+/g, '-')
      .replace(p, c => b.charAt(a.indexOf(c)))
      .replace(/&/g, '-and-')
      .replace(/[^\w\-]+/g, '')
      .replace(/\-\-+/g, '-')
      .replace(/^-+/, '')
      .replace(/-+$/, '')

    const slug = slugify(source.name)
    const basename = slugify(source.internal.type)

    return `/${basename}/${slug}`
  }

  createResolvers({
    Project: {
      slug: {
        resolve: source => resolveSlug(source),
      },
    },
  })
}

exports.createPages = async ({ actions, graphql, reporter }) => {
  const result = await graphql(`
    query {
      allProject {
        nodes {
          id
          slug
        }
      }
    }
  `)
  if (result.errors) {
    reporter.panic("error loading projects", result.errors)
    return
  }

  result.data.allProject.nodes.forEach( project => {
    actions.createPage({
      path: project.slug,
      component: require.resolve(`./src/templates/project.js`),
      context: {
        id: project.id
      }
    })
  })
}
To review this, we are getting all of our pages and looping over then using action.createPage and passing in an object to define the path, component and context. In our context object we are passing in the node ID so we can use a pageQuery with a variable to define the data object that will be passed as a prop into our React component inside /src/templates/project.js template. Let’s create the file in /src/templates/project.js and define our pageQuery and our React component definition:
import React from "react"
import { graphql } from "gatsby"

export const query = graphql`
  query($id: String!){
    project(id: {eq: $id}) {
      id
      slug
      name
      technologies
      url
    }
  }
`

const Project = ({ data: { project } }) => (
  <pre>
    { JSON.stringify(project, null, 4) }
  </pre>
)
export default Project
For pageQueries we can export a graphql tag query and Gatsby will recognize it as a pageQuery to be executed and the data injected into the Project component (defined below). For now, we will just stringify our project data to make sure that we’re getting the correct data for each project page that we navigate to. We can start up our development server by running: yarn workspace gatsby-theme-portfolio run develop and then navigating to http://localhost:8000/
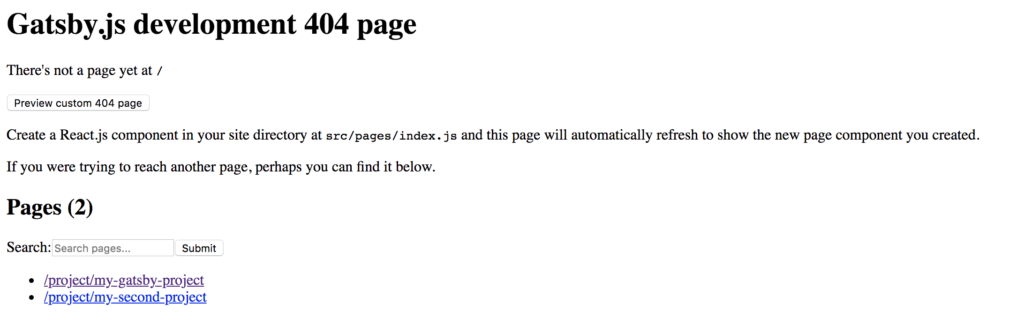
We can see that we have two new pages created at http://localhost:8000/project/my-gatsby-project and http://localhost:8000/project/my-second-project and if we navigate to either of those pages we will see that it is picking up our template in /src/templates/project.js as well as passing in the correct data based on the project id:
{
    "id": "9b1a01a6-07d4-5be1-afc0-eac34c0193a0",
    "slug": "/project/my-second-project",
    "name": "My Second Project",
    "technologies": [
        "vue.js",
        "nuxt.js",
        "GraphQL",
        "Tailwind CSS"
    ],
    "url": "https://github.com/hashinteractive/gatsby-theme-reactor/tree/master/gatsby-theme-reactor"
}
Review What We’ve Done
This is fantastic! We’ve come a long ways. Let’s quick review. So far we’ve:
- Setup our Yarn Workspaces so we can develop and test our Gatsby theme as a workspace dependency
- Installed the
gatsby-source-filesystemandgatsby-transformer-jsonplugins to source and transform our data which is stored at/src/data/Project.json - We defined a
gatsby-node.jsfile which makes sure the folder/src/datafolder exists and creates it if it does not - We added a
slugfield to our GraphQLProjecttype definition and used createResolvers api to resolve theslugfield to be the slugified value of the Project’s name - Finally, we used the createPages api to get all our projects defined in the
Project.jsonfile and loop through them creating Gatsby pages for each project and passing theslugfield as the path and the project id as the context - We defined a template in
/src/templates/project.jsand ran a pageQuery to get the data for each project and pass it to our React Component.
In Part Two of our tutorial we will look at how we can use our test-site workspace to extend our gatsby-theme-portfolio and also how we can add styles using Theme UI and finally how we can use component shadowing to override our theme’s components inside the test-site project to customize the look and feel of each component.