Nuxt GraphQL Authentication With Strapi
May 20th 2020
GraphQL has changed the way we think about API endpoints and is quickly becoming an important layer in the development stack for contemporary web apps. If you are using GraphQL in your Nuxt.js project there will likely come a time when you will need to authenticate a user to protect content in your GraphQL queries. Most GraphQL implementations use an Authorization Bearer header approach which sends a JSON Web Token in the GraphQL request to validate a user can make the request. Since we are using Strapi.io in our tutorial, the User-Permission Policies for content are control are executed before our our GraphQL Queries/Mutations are executed.
We enjoy using the Nuxt/GraphQL/Strapi technology stack and want to share how we’ve been successful with implementing GraphQL authentication in our Nuxt project as Strapi as our Authentication Provider.
Creating a Nuxt Project
We can start by installing a new Nuxt.js project with:
yarn create nuxt-app nuxt-graphql-strapiIn the configuration options during install we will leave everything unchecked as we will install our own dependencies. Once built we can make sure our project installed correctly by running yarn dev in our nuxt-graphql-strapi folder. We can navigate to http://localhost:3000/ and we’ll see our default Nuxt project welcome screen:
With our Nuxt project installed we can move on to installing our Strapi installation. We will use the Strapi quickstart installation to quickly get our Strapi project up and running which will use a SQLite database configuration:
yarn create strapi-app strapi-graphql --quickstartOnce installed we can navigate to http://localhost:1337/admin and create an admin user for our Strapi project. Once logged in we can install the Strapi GraphQL plugin by navigating to the Marketplace http://localhost:1337/admin/marketplace and installing the GraphQL plugin. Alternatively, you can install the plugin from the command line by running:
yarn strapi install graphqlOnce installed you should be able to navigate to the GraphQL playground to make sure the GraphiQL is working: http://localhost:1337/graphql.
Next, we will want to create another user (besides our admin user) to authenticate against since our admin user cannot use the normal User/Permissions endpoint and for security reasons. You can navigate to “Users” in the left hand panel or by going to http://localhost:1337/admin/plugins/content-manager/collectionType/plugins::users-permissions.user and clicking the “Add New User” button in the upper right hand corner. Enter an email, username and password and make sure “confirmed” field is checked to true. Also, you can add the “Authenticated” role to the user and click “Save”. Now that we have a user we’ll want to create a content type that the user can manage.
Navigate to the “Content-Types Builder” or by going to http://localhost:1337/admin/plugins/content-type-builder/content-types/ and click on “Create new collection type”. In the modal screen we can add a content type called article making sure that it is singular. We will then be prompt to add fields to our content type. We can add a field of type “text” called title and click on Advanced Settings to make sure the field is required. We can then add a second field of type “UID” which is a unique identifier field with the Name being slug and we can “Attach the field” to our newly created title field. Once again, under advanced settings we can make sure the field is required and click “Add Another Field”. We will select the field type of “Rich text” and name the field content and click on Finish and click on Save to save our new content type. The application should restart and you should see an “Articles” link in the left hand sidebar navigation.
In order to use our Articles content type we will need to add some permissions. First, we can navigate to “Roles and Permissions” (or by http://localhost:1337/admin/plugins/users-permissions/roles) and click on the “Public” role. Under our “Article” content type we can select: count, find and findone and then navigate up to “Save”. Returning to the “Roles and Permissions” screen we can click on “Authenticated” role and scrolling down to our Article content type we can select: create, delete and update and then click “Save”. To make sure this is working let’s create a new content type in our admin panel.
Navigate to “Articles” in the left hand sidebar. In the title field we can add “Article One” and the slug should be auto-generated for us. In the content field we can input some placeholder text for now. We can do the same for a second article naming it “Article Two”. With those two pieces created we can navigate to our GraphiQL playground to make sure everything is working as expected.
GraphiQL Playground
Since we set our “Article” content type for find and findone to our Public role, any user should be able to access the content without permission. We can validate by running the GraphQL query command:
query{
  articles{
    id
    title
    slug
    content
  }
}
And we should get a valid response:
{
  "data": {
    "articles": [
      {
        "id": "5ec42a11fd4dce5913783647",
        "title": "Article One",
        "slug": "article-one",
        "content": "### Article One\n\nLorem ipsum ..."
      },
      {
        "id": "5ec42a30fd4dce5913783648",
        "title": "Article Two",
        "slug": "article-two",
        "content": "Article Two\n\nLorem ipsum..."
      }
    ]
  }
}
Now, let’s try executing a create mutation to create a new article and see what happens:
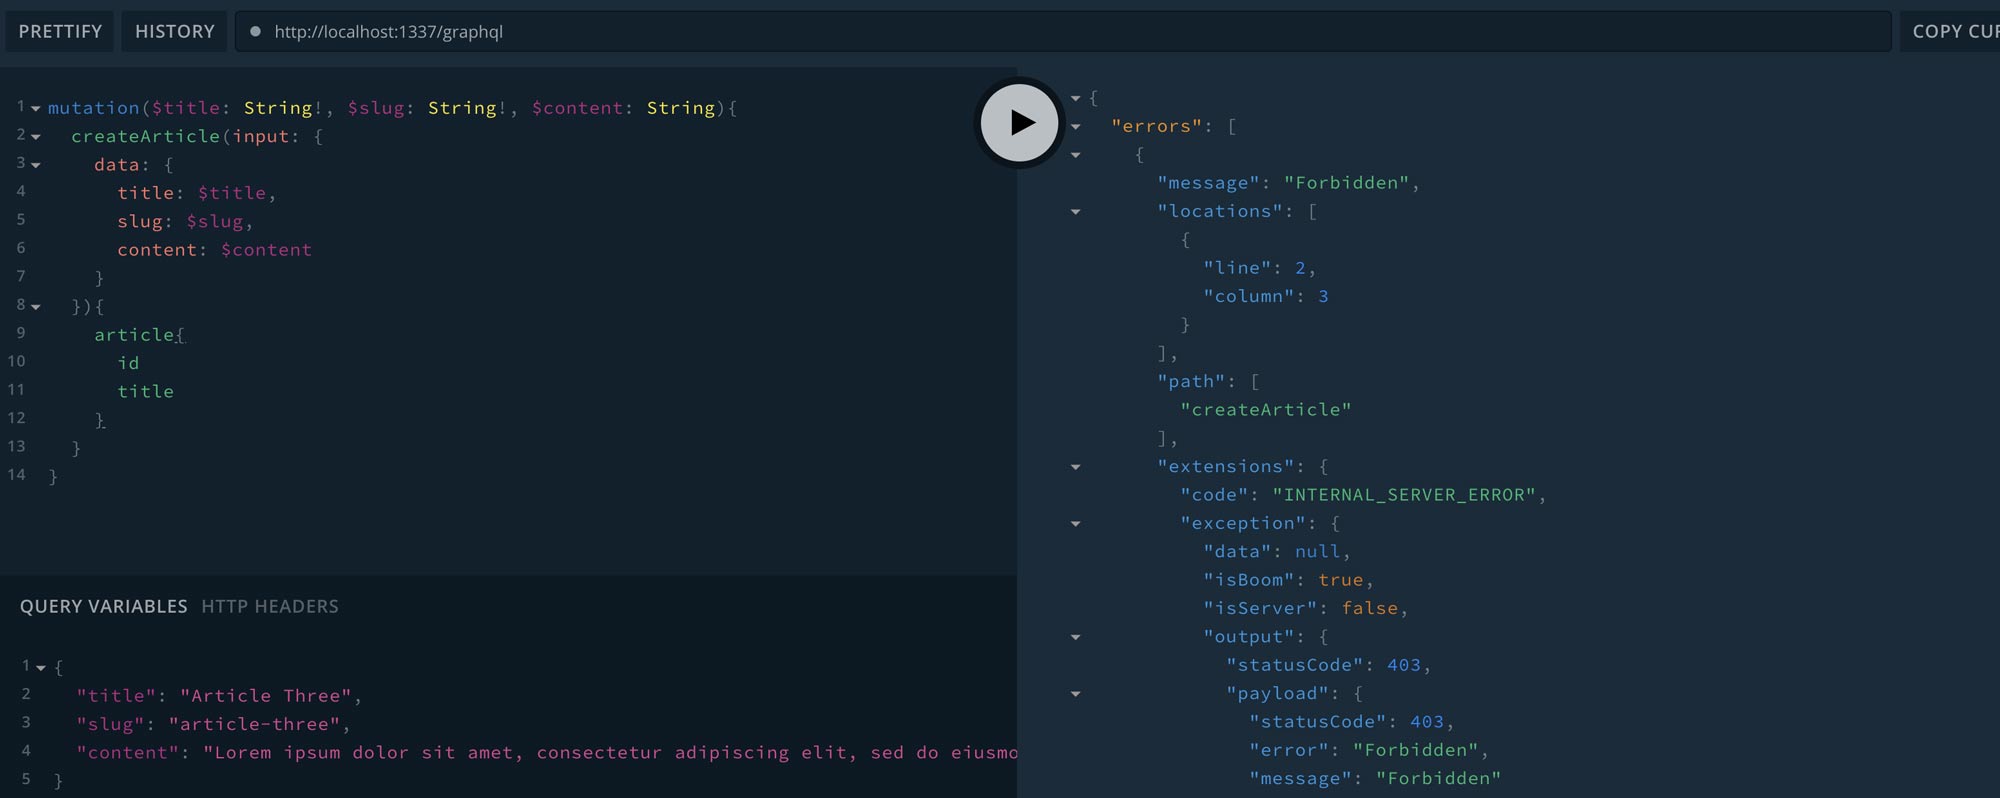
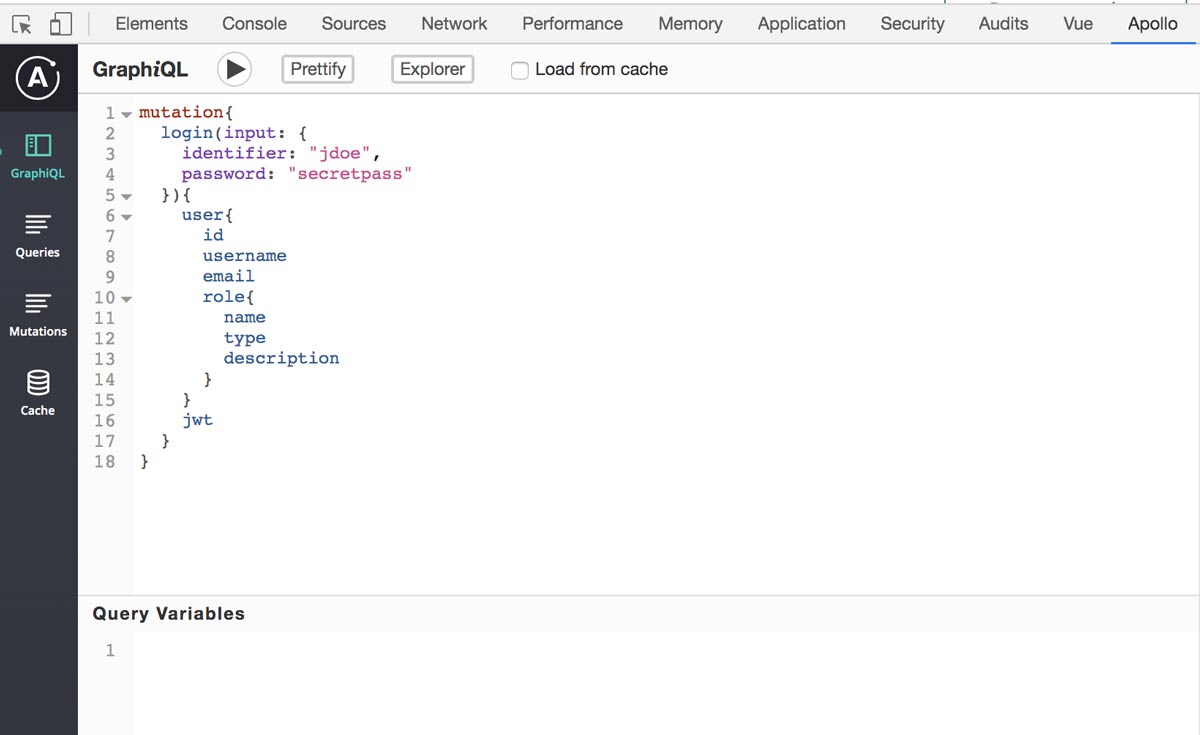
You can see that we got a 403 Forbidden response from the server which is the intended response since we were not sending the mutation request as an authenticated user. Let’s open a new GraphiQL tab and get a jwt token to authenticate our user:
mutation{
  login(input: {
    identifier: "jdoe",
    password: "secretpass"
  }){
    user{
      id
      username
      email
      role{
        name
        type
        description
      }
    }
    jwt
  }
}
Make sure you replace the identifier field with the username you created for your Strapi user and the respective password. We should see a valid response:
{
  "data": {
    "login": {
      "user": {
        "id": "5ebaa45e1de01f050014fcf3",
        "username": "jdoe",
        "email": "[email protected]",
        "role": {
          "name": "Authenticated",
          "type": "authenticated",
          "description": "Default role given to authenticated user."
        }
      },
      "jwt": "eyJhbGciOiJIUzI1NiIsInR5cCI6IkpXVCJ9.eyJpZCI6IjVlYmFhNDVlMWRlMDFmMDUwMDE0ZmNmMyIsImlhdRghfnetuiUyOSwiZXhwIjoxNTkyNTA3NTI5fQ.quOrIxr3lxb5rX5eWkKzGuNo6g92eRjOYGdwV_S07KOw"
    }
  }
}
Now that we have our jwt token we can use that to send an authenticated createArticle mutation to create a new article. We can navigate back to our “createArticle” tab and down by our “Variables” tab we can click on the “Headers” and copy our jwt to and Authorization: Bearer header such as:
{
  "Authorization": "Bearer eyJhbGciOiJIUzI1NiIsInR5cCI6IkpXVCJ9.eyJpZCI6IjVlYmFhNDVlMWRlMDFmMDUwMDE0ZmNmMyIsImlhdRghfnetuiUyOSwiZXhwIjoxNTkyNTA3NTI5fQ.quOrIxr3lxb5rX5eWkKzGuNo6g92eRjOYGdwV_S07KOw"
}
Now executing the command we should see that “Article Three” is in fact created for us since we’re sending a mutation request from an Authenticated user that has the roles/permissions to create an article!

This is great news! We now know that we’re able to use a jwt authorization header to authenticate a user request from our application. In the previous example we used the GraphiQL playground but we will now walk through how to use GraphQL Authentication in our Nuxt.js app.
Using Nuxt Apollo for GraphQL
One of the defacto GraphQL clients to interface with your GraphQL server is Apollo GraphQL Client.
Apollo Client is a complete state management library for JavaScript apps. Simply write a GraphQL query, and Apollo Client will take care of requesting and caching your data, as well as updating your UI.
https://www.apollographql.com/docs/react/
Fortunately, in the Vue.js community there is great support for using the Apollo Client in your Vue.js app. Furthermore, the project has been converted into a Nuxt module for us to use inside our Nuxt.js project. The @nuxtjs/apollo dependency allows us to utilize the Apollo Client to interface with our Strapi GraphQL layer. We can install the module and by running:
yarn add @nuxtjs/apollo graphql-tagNote we also installed graphql-tag to use files that end with .gql so our webpack compiler can transform GraphQL query strings into GraphQL AST. Now we can setup some simple config for our @nuxtjs/apollo module. In your Nuxt.js project folder open up the nuxt.config.js file and add:
require('dotenv').config()

export default {
  ...
  env: {
    graphEndpoint: process.env.graphEndpoint
  },
  modules: [
    '@nuxtjs/apollo'
  ],
  apollo: {
    clientConfigs: {
      default: {
        httpEndpoint: `${process.env.graphEndpoint}`
      }
    }
  },
}
If you run this you will likely get an error if you did not install the dotenv dependency. You can add it by running yarn add dotenv. Finally, we’ll need to add the .env file to our Nuxt.js project directory specifying our graphEndpoint variable:
graphEndpoint="http://localhost:1337/graphql"Also, you may run into an core-js error since one of our @nuxtjs/apollo dependencies requires core-js. You can fix this by installing the core-js dependency:
yarn add -D core-js@2 @babel/runtime-corejs2With that in place we can start our nuxt development server with yarn dev and navigate back to http://localhost:3000 to see the Nuxt.js welcome screen. Not much looks different but if we install the Chrome Apollo Developer Tools we can open up the developer console: Option + ⌘ + J and navigate to the Apollo tab and we can try using our GraphQL Mutation to login with our user as we did in the GraphQL playground:
mutation{
  login(input: {
    identifier: "jdoe",
    password: "secretpass"
  }){
    user{
      id
      username
      email
      role{
        name
        type
        description
      }
    }
    jwt
  }
}
Executing this we can see that we have successfully linked our Apollo Client to our GraphQL endpoint in our project using the @nuxtjs/apollo module!
Nuxt Login GraphQL Authentication
We can now create a login page that will handle the functionality of logging in our user and setting the jwt token for further requests (such as creating an article). First, we’ll create a nuxt page located at ./pages/login.vue. Inside we can scaffold out our <template> for our form:
<template>
<section class="py-24">
<div class="container mx-auto">
<div class="flex justify-center">
<div class="w-full md:w-1/2 flex flex-col items-center mx-auto bg-gray-200 p-8">
<h3 class="text-3xl mb-8">Login Page</h3>
<div class="w-full max-w-xs">
<form @submit.prevent="login()" class="bg-white shadow-md rounded px-8 pt-6 pb-8 mb-4">
<div class="mb-4">
<label class="block text-gray-700 text-sm font-bold mb-2" for="username">Username</label>
<input
v-model="form.identifier"
class="shadow appearance-none border rounded w-full py-2 px-3 text-gray-700 leading-tight focus:outline-none focus:shadow-outline"
id="username"
type="text"
placeholder="Username"
/>
</div>
<div class="mb-6">
<label class="block text-gray-700 text-sm font-bold mb-2" for="password">Password</label>
<input
v-model="form.password"
class="shadow appearance-none border rounded w-full py-2 px-3 text-gray-700 mb-3 leading-tight focus:outline-none focus:shadow-outline"
id="password"
type="password"
placeholder="******************"
/>
</div>
<div class="flex items-center justify-between">
<button
class="bg-blue-500 hover:bg-blue-700 text-white font-bold py-2 px-4 rounded focus:outline-none focus:shadow-outline"
type="submit"
>Sign In</button>
<a
class="inline-block align-baseline font-bold text-sm text-blue-500 hover:text-blue-800"
href="#"
>Forgot Password?</a>
</div>
</form>
<p class="text-center text-gray-500 text-xs">©2020 Acme Corp. All rights reserved.</p>
</div>
</div>
</div>
</div>
</section>
</template>In our html we have two form fields mapped to form.username and form.password respectively. We also are preventing the default submit event and using a method we’ll define called login(). We are using our favorite utility library Tailwind CSS for some formatting 😊
Now we can focus on our <script> portion of our Vue single file component to define our login() method.
<script>
import gql from "graphql-tag";
export default {
  data() {
    return {
      form: {
        identifier: "",
        password: ""
      }
    };
  },
  methods: {
    async login(){
      const credentials = this.form
    }
  },
  async mounted(){
    //clear apollo-token from cookies to make sure user is fully logged out
    await this.$apolloHelpers.onLogout()
  }
}
</script>
We have our data bindings form.username and form.password and when the form is submitted our login() function is invoked and we are setting the const credentials to this.form. We are using async declaration so we can await promises to resolve. Let’s focus on the login() function and then we can step through what’s happening:
  methods: {
    async login() {
      const credentials = this.form;
      try {
        const { data: { login: { user, jwt } } } = await this.$apollo.mutate({
          mutation: gql`
            mutation($identifier: String!, $password: String!) {
              login(input: { identifier: $identifier, password: $password }) {
                user {
                  id
                  username
                  email
                  role {
                    name
                    type
                    description
                  }
                }
                jwt
              }
            }
          `,
          variables: credentials
        })
        //set the jwt to the this.$apolloHelpers.onLogin
        await this.$apolloHelpers.onLogin(jwt)
      } catch (e) {
        console.error(e)
      }
    }
  }
Since we have the @nuxtjs/apollo module installed we have access to this.$apollo.mutate which is a helper to send mutation requests to our GraphQL endpoint. We are also importing the gql tag so we can pass a graph-tag literal to be converted into AST format. We are passing in two variable to our mutation $identifier and $password which are both required to authenticate our user. This is the mutation that we’ve ran in both our GraphiQL playground and Apollo Developer tools. We are destructuring the user and jwt variable from the response data and now that we have the jwt we can use the this.$apolloHelpers.onLogin(jwt) to set the Authorization Header for future requests to Authorization: Bearer eyJhbGciOiJIUzI1NiIsInR5cCI6IkpXVCJ9... so we will be making an authenticated request!
Nuxt Middleware Protected Route with GraphQL Authorization Token
Now that we have a jwt token saved to our Apollo Token we can use this to protect routes in Nuxt with Nuxt’s Middleware ability. First, we’ll make a page in our application called protected.vue which will be a page that we will use the middleware function on to make sure the user is logged in. Create the page at ./pages/protected.vue and we can add:
<template>
  <div class="container mx-auto">
    <div class="flex">
      <div class="w-full p-8">
        <pre class="p-4 bg-gray-100">{{ JSON.stringify(me, null, 2) }}</pre>
      </div>
    </div>
  </div>
</template>

<script>
import gql from 'graphql-tag'
export default {
  middleware: ['authenticated'],
  data(){
    return {
      me: {}
    }
  },
  apollo: {
    me: {
      query: gql`
        query {
          me{
            id
            email
            username
            role{
              name
            }
          }
        }
      `
    }
  }
}
</script>
All we’re doing is making a call to the GraphQL query to the provided me endpoint by Strapi User and Permissions Plugin. Since we’re already setting our apollo-token authorization token the token will be passed in the request which is necessary to know who “me” is. We are also defining middleware called 'authenticated' which will look for a file in the project’s middleware directory called authenticated.js with a default exported function. Let’s write the middleware to check if the user is authenticated when accessing the protected route. Create a file in ./middleware/authenticated.js of your project:
import gql from 'graphql-tag'

export default async function ({app, redirect}) {
  const hasToken = !!app.$apolloHelpers.getToken()
  if (!hasToken) {
      return redirect('/login')
  }
  //make sure the token is still valid
  try{
    const { data: { me } } = await app.apolloProvider.defaultClient.query({
      query: gql`
        query {
          me{
            id
            email
            username
            role{
              name
            }
          }
        }
      `
    })
    if(!Object.keys(me).length){
      return redirect('/login')
    }
    //we are good to go and validated
  }catch(e){
    //token is not valid
    //logout user to clear storage
    try{
      const result = await app.$apolloHelpers.onLogout()
      //redirect them to login page
      return redirect('/login')
    }catch(e){
      console.error(e)
    }
  }
}
Our first check that we want to do is make sure that there is an apollo-token set by using the app.$apolloHelpers.getToken() helper function which returns the token. We are casting this to a boolean value by using !!app.$apolloHelpers.getToken() so it’s either true if there is a token or false if there is not. If we do not have a token we’ll use the redirect function to redirect the user to our login page. The second check that we want to do is make sure that the jwt is still valid. We can do this by making an GraphQL query to the me endpoint (as we’re doing in our protected.vue page). Since the me endpoint requires the jwt auth token, if the token is expired or no longer valid (ie. it has been manipulated) we can redirect the user to the login page as well. Otherwise, if everything is valid with our jwt token we can proceed to the protected.vue page.
We have successfully used our Strapi GraphQL endpoint to integrate into our Nuxt.js app for user authentication. We can take this a step further by using the roles value in our middleware function(s) to validate if a user is able to navigate to a specific route. Hopefully you can use this to build your next web app with these trending technologies!