Strapi Mailchimp Service Add Contact to List
April 30th 2020
Strapi is rapidly growing headless CMS solution that is open source and self hosted to allow you customization and flexibility for your backend API service. One advantage of Strapi is the ease of scaffolding an API to expose endpoints that can be used as micro-services in your front-end or JAMStack application. Today we will do a quick run through of how you can setup a Strapi service using the Strapi Hooks system to expose a Mailchimp service that will add an email contact to your Mailchimp audience list.
Mailchimp API Key
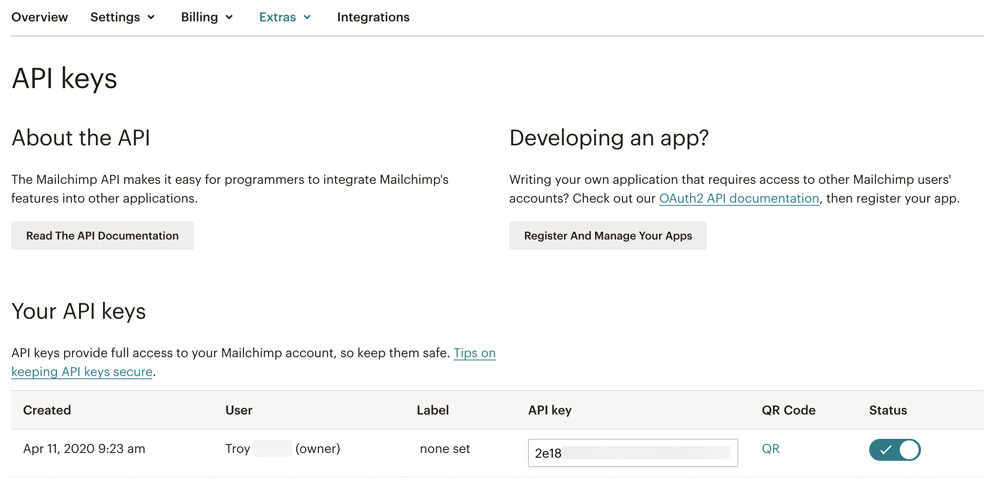
In order for us to setup a service we’ll need to obtain our Mailchimp API key from the Mailchimp dashboard. You can login to your Mailchimp Account and once logged in you can navigate to the account page (using the drop down in the upper right hand corner). Once you are on the account page you will be able to see a secondary navigation that says Extras and under that dropdown you can click on the API keys link. You should have a default API key created for you which you can reference later in the tutorial.
Strapi Hooks
The hooks are modules that add functionality to the core. They are loaded during the server boot. You can use a hook to bootstrap the configuration and create an instance of a third-party client library, such as Mailchimp, which can then be used throughout your strapi project as a service.
We can create hooks at the global level of our Strapi project or we can have different hooks based on the environment you are running strapi on. This is useful if you need different API keys for a development environment for testing versus a production environment. For instance, if you are creating a Stripe service for your strapi project you can create a hook that loads your sk_test key in the development environment and a sk_live key for your production environment. These hooks can be added via environment variables loaded into our hook config file. Since we are going to be using the mailchimp client service across all of our environments we can edit the global file at ./config/hook.json which will enable the hook throughout all environments. Inside we can add a mailchimp property (which needs to reflect the folder structure we create in the next step). Inside hook.json we can enable our hook and add our token such that:
module.exports = {
  settings: {
    github: {
      enabled: true,
      token: process.env.MAILCHIMP,
    },
  },
}
Now we will need to create our .env file inside our project root and define our Mailchimp API token.
MAILCHIMP=2e1844000Gwxsk78uiDt013aaV9sxpo-usNow we can access our token key in our hooks/mailchimp/index.js file via const { token } = strapi.config.get('hook.settings.mailchimp'). Let’s take a look at how we can create the Mailchimp client instance in our hook file.
In order to setup hooks we will need to create a hooks folder in our project directory. Inside that folder we will need to create a sub-folder for the project hook that we can call mailchimp (making sure the folder name matches the property key that we defined in our ./config/hook.json file. Now we will have a folder structure in our project directory ./hooks/mailchimp. Inside that folder we will create a new file called index.js which will be loaded on server boot. Inside this file we can return an initialize() function which we be called initially for every hook defined on server boot:
The hooks are modules that add functionality to the core. They are loaded during the server boot.
https://strapi.io/documentation/3.0.0-beta.x/concepts/hooks.html#structure
initialize(function): Called during the server boot.
Before we define our initialize() function we will need to download the Mailchimp node package called mailchimp-api-v3 which is a Mailchimp api wrapper for v3 of the mailchimp api, with batch handling. We can use our package manager of choice:
yarn add mailchimp-api-v3
//Or
npm i mailchimp-api-v3
With the package installed we can complete our initialize() function in ./hooks/mailchimp/index.js file:
const Mailchimp = require('mailchimp-api-v3');

module.exports = strapi => {
  return {
    async initialize() {
      const { token } = strapi.config.get('hook.settings.mailchimp')
      strapi.services.mailchimp = new Mailchimp(token)
    },
  };
}
We are first requiring our mailchimp-api-v3 library as Mailchimp. Secondly, we are destructuring our mailchimp token property that we set in ./config/hook.json file via const { token } = strapi.config.hook.mailchimp. Lastly, we are creating a strapi service called accessible via strapi.services.mailchimp and setting it to a new instance of Mailchimp client library. Now in any of our endpoints we will be able to access our mailchimp client library via strapi.services.mailchimp.
Creating Mailchimp Subscription Endpoint
We can now create a route and a controller to send a request to our strapi endpoint to access the mailchimp service we created and use it to subscribe a user. Inside our project ./api folder we can create a folder called subscribe so we will have ./api/subscribe. Inside that folder we can create two sub folders: ./api/subscribe/config and ./api/subscribe/controllers. Inside our ./api/subscribe/config folder we can create our routes definition by creating a file ./api/subscribe/config/routes.json file. Inside the routes.json file we can create our route definition:
{
  "routes": [
    {
      "method": "POST",
      "path": "/subscribe",
      "handler": "Subscribe.index",
      "config": {
        "policies": []
      }
    }
  ]
}
Now inside our ./api/subscribe/controllers folder we can create a file at ./api/subscribe/controllers/Subscribe.js which will export an object with our action definitions. Since we set the action handler for a POST request for the route /subscribe to be Subscribe.index we will need to create the action in our Subscribe.js file:
'use strict';

/**
 * A set of functions called "actions" for `Subscribe`
 */

module.exports = {
  index: async ctx => {

  }
}
We will come back to this action definition in a bit but before that we need to obtain our Audience ID from our Mailchimp account.
Mailchimp Audience ID
In order to use the API to subscribe a contact to a list/audience you will need the audience ID. To obtain the audience ID you can login to your Mailchimp account and at the top of the page in the main navigation you can click on “Audience” and you will see a list of your Audiences. If you are on the free account you will only have one Audience (the default for that account). You can click into that audience and navigate to the “Settings” tab under the audience you click on:
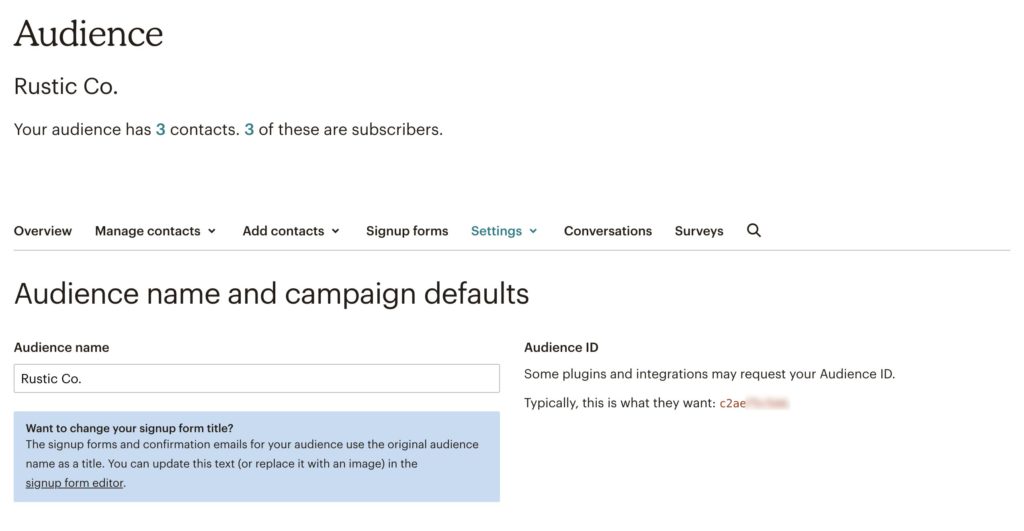
Copy the Audience ID value under the Settings tab as we will need that to create our /subscribe endpoint.
Subscribe User To Mailchimp Audience
To recap, we have created a strapi hook that calls the initialize() function on server boot. Inside the initialize() function we are creating a strapi service which is an instance of the Mailchimp API wrapper mailchimp-api-v3 and can access the service via: strapi.services.mailchimp which we will use in our /subscribe action endpoint. Let’s return to our file ./api/subscribe/controllers/Subscribe.js and finish our index action in that file:
'use strict';

/**
 * A set of functions called "actions" for `Subscribe`
 */

module.exports = {
  index: async ctx => {
    const { email } = ctx.request.body
    if(!email){
      ctx.status = 400
      ctx.body = "Email is required"
      return
    }
    try{
      const response = await strapi.services.mailchimp.request({
        method: 'post',
        path: '/lists/c2axxxxx/members',
        body: {
          email_address: email,
          status: "subscribed"
        }
      })
      const { _links, ...res } = response
      ctx.status = res.statusCode
      ctx.body = JSON.stringify(res)
    }catch(err){
      ctx.status = err.status
      ctx.body = err.detail
    }
  }
}
In this endpoint we are expecting that the POST body contains a email value for the email address that we will subscribe to our Audience. If we do not receive and email we will return a 400 response that the email is required. After we ensure there is an email we can use our Strapi service strapi.services.mailchimp to create an API request in which we are sending a POST request to our /lists/${audienceId}/members where the audienceId is our Mailchimp Audience ID we obtained from the last step. Upon response we are destructuring the response object and we are obtaining all of the properties of the response object, while deleting the _links property as that is not needed in the ctx.body response. We are stringifying our res property and sending it as the ctx.body in response to our endpoint request.
Testing the Subscribe Endpoint
Before we test our endpoint we’ll need to allow permissions to access our /subscribe route. In our Strapi dashboard we can navigate to the Users & Permissions plugin and click on the Public role. Scroll down to our Subscribe controller and make sure that the index action is checked. Scroll back up and click the “Save” button.
Now using Postman or any other API testing service we can send a POST request to our endpoint which is accessible via: http://localhost:1337/subscribe making sure that we are sending the email value in the body of the POST request. If everything is setup as expected we should receive our response from our Mailchimp API request such as:
{"id":"10b2463dxxxxxxxxxxxx","email_address":"[email protected]","unique_email_id":"b59xxxxx","web_id":375172716,"email_type":"html","status":"subscribed","merge_fields":{"FNAME":"","LNAME":"","ADDRESS":"","PHONE":"","BIRTHDAY":""},"stats":{"avg_open_rate":0,"avg_click_rate":0},"ip_signup":"","timestamp_signup":"","ip_opt":"66.199.203.102","timestamp_opt":"2020-04-30T13:27:12+00:00","member_rating":2,"last_changed":"2020-04-30T13:27:12+00:00","language":"","vip":false,"email_client":"","location":{"latitude":0,"longitude":0,"gmtoff":0,"dstoff":0,"country_code":"","timezone":""},"source":"API - Generic","tags_count":0,"tags":[],"list_id":"c2axxxxxx","statusCode":200}Success! We have now created a Strapi service to be able to subscribe a user to our Mailchimp Audience. Through this endpoint you can send request to subscribe users to your email marketing list. You can also create more endpoints using our strapi.services.mailchimp service to manage your Audience such as updating contact information or removing a contact from a list. Until next time, stay curious, stay creative.