Nuxt.js Mailchimp Integration Add Contact to List
April 13th 2020
Nuxt.js is great framework for building out your website or front-end applications. With the rising popularity of the framework more and more websites are migrating to the JAMStack (JavaScript, API & HTML Markup) technology. Mailchimp is a popular email marketing platform that allows you to store and manage email contacts, create campaigns and send marketing emails to your audience. There is a lot more you can do with Mailchimp such as social integration, landing pages and advanced marketing funnels, but today we want to focus on how to add a subscriber to your Mailchimp list through the Mailchimp API (aligning with the API in JAMStack) using Nuxt.js.
In this tutorial we’re going to assume that you have a Nuxt project already started and you are able to run it locally. If you do not, you can jump over to the getting started documentation to install your project.
Mailchimp Audience ID and API
Previously, an audience ID in Mailchimp was called a list ID. Mailchimp has redefined some of their verbiage so if you have done a previous integration or read some of their old documentation it may be more familiar with the “list” then the audience definition. For intents and purposes, in this article they are the same. In order to use the API to subscribe a contact to a list/audience you will need the audience ID. To obtain the audience ID you can login to your Mailchimp account and at the top of the page in the main navigation you can click on “Audience” and you will see a list of your Audiences. If you are on the free account you will only have once Audience (the default for that account). You can click into that audience and navigate to the “Settings” tab under the audience you click on:
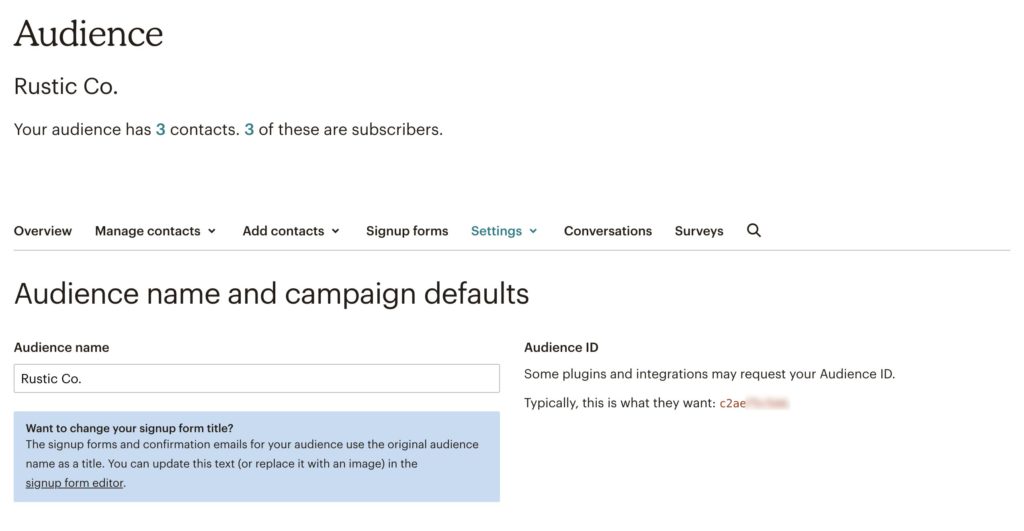
You can see under the settings there is an Audience ID that you will want to copy and save so we can use it later when making our API call. Next we will need to get our API Key for our Mailchimp account. To obtain the API Key you can navigate to Account (in the upper right hand corner) and then once you are on the account page you can click on the sub tab called Extras and select API Keys from the drop down options. Copy the API Key as you will need it to make your API call. Now that we have those two important pieces we can turn to our Nuxt project to create the integration.
Client Side Form Validation with VeeValidate
We will be using the VeeValidate library to handle client side form validation to make sure our users are inputting an email address in our form field. We can install VeeValidate into our Nuxt project using our package manager of choice:
yarn add vee-validate
//or
npm install vee-validate
In order to use VeeValidate we will need to inject the higher order components ValidationObserver and ValidationProvider into our global Vue project’s components to be used throughout our project. In Nuxt we can easily do this using a Nuxt plugin. In the plugins folder create a file called vee-validate.js and inside we can start importing our VeeValidate library and extending it to use in our Nuxt project:
import Vue from 'vue';
import { ValidationProvider, ValidationObserver, extend } from 'vee-validate';

Vue.component('ValidationProvider', ValidationProvider)
Vue.component('ValidationObserver', ValidationObserver)
Also, to keep the bundle size lean for your project, VeeValidate provides validation rules to you through the library but doesn’t inject any of the rules into your project, so we are required to extend the rules to add the necessary validation rules to our project. In our project we are going to be using required and email validation rules, so we can import those and use the extend method (imported from VeeValidate) to make sure our rules are available in our project:
import Vue from 'vue';
import { ValidationProvider, ValidationObserver, extend } from 'vee-validate';

import { required, email } from 'vee-validate/dist/rules';

// Add the required rule
extend('required', {
  ...required,
  message: (field) => `${field} is required.`
})
// Add the email rule
extend('email', email)

Vue.component('ValidationProvider', ValidationProvider)
Vue.component('ValidationObserver', ValidationObserver)
Finally, we will want to include this plugin in our Nuxt project and we can do that by adding it to our nuxt.config.js file under the plugins key:
export default {
...
  plugins: [
    { src: '~/plugins/vee-validate', ssr: false },
  ],
...
}
Since VeeValidate is client side only library we are adding ssr: false option to our plugin to make sure it’s only loaded on the client and not the server. We will have to remember this when building our form as we will need to wrap our form in <client-only> component to make sure it’s only rendered in the client.
Nuxt Mailchimp Form Setup
In order to capture a subscribers email and add them to our audience list we will need to create a form within our Nuxt project to handle user’s email input. We can create a component called MailchimpSignup.vue inside our project directories components folder. Inside our MailchimpSignup.vue component we will be using our ValidationObserver higher order component that we defined in our vee-validate.js plugin to make sure the email field is valid on the client side. Inside our component we can define:
 <template>
    <validation-observer
      v-slot="{ invalid }"
      ref="subscribe"
      tag="form"
      class="w-full max-w-lg"
      @submit.prevent="!invalid && subscribe()">
      <div class="flex items-start">
        <div class="w-2/3">
          <validation-provider
            rules="required|email"
            :bails="false"
            tag="div"
            name="Email"
            v-slot="{ errors }">
            <input
              v-model="form.email"
              class="shadow bg-gray-300 appearance-none border-2 border-gray-300 w-full mb-2 py-2 px-4 text-gray-700 leading-tight focus:outline-none focus:bg-white focus:border-primary-300"
              id="grid-email"
              type="email"
              placeholder="Email"
            />
            <ul class="list-disc list-inside text-red-500 m-2" v-if="errors.length">
              <li class="leading-none" v-for="error in errors"><small>{{ error }}</small></li>
            </ul>
          </validation-provider>
          <p class="text-gray-600 text-xs px-2">Don't worry, we don't like spam either!</p>
        </div>
        <div class="w-1/3 pl-2">
          <button
            type="submit"
            class="btn-primary rounded"
            :class="{ disabled: invalid }"
            :disabled="invalid">
            <span class="mr-2">Subscribe</span>
          </button>
        </div>
      </div>
    </validation-observer>
</template>
Inside our template we are using the ValidationObserver as a wrapper and exposing invalid property through the v-slot directive. Anytime our invalid is true our form submit will be disabled and you will not be able to submit the form. Likewise, on the input field we are using ValidationProvider to make sure that our email input is in fact an email and it is required. If these conditions aren’t met than our invalid property will evaluate to true and the user will not be able to submit the form. Let’s look at the subscribe() function which will be called when the form is valid and submitted:
 <template>
    <validation-observer
      v-slot="{ invalid }"
      ref="subscribe"
      tag="form"
      class="w-full max-w-lg"
      @submit.prevent="!invalid && subscribe()">
      <div class="flex items-start">
        <div class="w-2/3">
          <validation-provider
            rules="required|email"
            :bails="false"
            tag="div"
            name="Email"
            v-slot="{ errors }">
            <input
              v-model="form.email"
              class="shadow bg-gray-300 appearance-none border-2 border-gray-300 w-full mb-2 py-2 px-4 text-gray-700 leading-tight focus:outline-none focus:bg-white focus:border-primary-300"
              id="grid-email"
              type="email"
              placeholder="Email"
            />
            <ul class="list-disc list-inside text-red-500 m-2" v-if="errors.length">
              <li class="leading-none" v-for="error in errors"><small>{{ error }}</small></li>
            </ul>
          </validation-provider>
          <p class="text-gray-600 text-xs px-2">Don't worry, we don't like spam either!</p>
        </div>
        <div class="w-1/3 pl-2">
          <button
            type="submit"
            class="btn-primary rounded"
            :class="{ disabled: invalid }"
            :disabled="invalid">
            <span class="mr-2">Subscribe</span>
          </button>
        </div>
      </div>
    </validation-observer>
</template>
<script>
import axios from 'axios'
export default {
  data(){
    return {
      form: {
        email: ''
      },
      response: {
        status: null,
        message: ''
      },
      cachedForm: {}
    }
  },
  methods: {
    async subscribe(event){
      const formData = {...this.form}
      try{
        const {data, status} = await axios.post('/api/subscribe', formData)
        this.response.status = status
        this.response.message = `Thanks, ${data.email_address} is subscribed!`
        this.form = {...this.cachedForm}
        this.$refs.subscribe.reset()
      }catch(e){
        console.log(e)
      }
    }
  },
  mounted(){
    this.cachedForm = {...this.form}
  }
}
</script>
In our component we are storing the data for the email in form.data and we’re binding the input with the v-model directive. When the form gets submitted we are calling subscribe() method which is asynchronous so we are able to await our promise being fulfilled from our http post request. Our subscribe() function is making a call to the endpoint /api/subscribe which we will define using Nuxt serverMiddleware on the server to ensure our API Key is safely stored and we’re not exposing it on the client side. Let’s turn our attention to our serverMiddleware to see how we will be handling our API request to Mailchimp.
Nuxt Server Middleware Endpoint
Nuxt internally creates a connect instance that we can add our own custom middleware to. This allows us to register additional routes (typically /api routes) without need for an external server. This will work perfect for proxying our API call to Mailchimp to add a subscriber to our Mailchimp Audience. Let’s create a folder in our project directory called api and inside we will create a file called index.js. Inside this file we are going to be creating an express app to handle our subscribe route and make the Mailchimp API call. We can scaffold our index.js file:
import express from 'express'

const apiKey = process.env.MAILCHIMP_API_KEY || 'YOUR_API_KEY'

const app = express()
app.use(express.json())

app.post('/subscribe', async(req, res) => {
  //make our api request to Mailchimp
})

export default {
  path: '/api',
  handler: app
}
If you haven’t already, you will need to install express as a package dependency for your project. We are also adding our API key using an environment variable MALCHIMP_API_KEY and as a fallback we can hardcode the variable into the index file as well. Using the env variable is best practice and you can look at how to add an environment variable to your project in the Nuxt Documentation. We are also going to use another package dependency called mailchimp-api-v3 (provided by Mailchimp) to make our API call to subscribe users to an audience. Let’s install this package using your package manager and we can include it into our index.js file:
yarn add mailchimp-api-v3
//or
npm install mailchimp-api-v3
Inside our index.js file we can include it and create a new instance of our Mailchimp client:
import express from 'express'
import Mailchimp from 'mailchimp-api-v3'

const apiKey = process.env.MAILCHIMP_API_KEY || 'YOUR_API_KEY'
const mailchimp = new Mailchimp(apiKey)

const app = express()
app.use(express.json())

app.post('/subscribe', async(req, res) => {
  //make our api request to Mailchimp
})

export default {
  path: '/api',
  handler: app
}
Now we are able to use the mailchimp client to send the request. You will need your audience ID that we obtained at the beginning of the tutorial to complete the request.
import express from 'express'
import Mailchimp from 'mailchimp-api-v3'

const apiKey = process.env.MAILCHIMP_API_KEY || 'YOUR_API_KEY'
const audienceId = 'YOUR_AUDIENCE_ID'
const mailchimp = new Mailchimp(apiKey)

const app = express()
app.use(express.json())

app.post('/subscribe', async(req, res) => {
  const {email: email_address} = req.body
    try{
      const response = await mailchimp.request({
        method: 'post',
        path: `/lists/${audienceId}/members`,
        body: {
          email_address,
          status: "subscribed"
        }
      })
      const { _links, ...result } = response
      res.status(result.statusCode).json(result)
    }catch(err){
      res.status(err.status).send(err.detail)
    }
})

export default {
  path: '/api',
  handler: app
}
In the express middleware function we are destructuring our req.body object to obtain the email field and renaming it to email_address which is what our mailchimp client expects. We are using mailchimp.request to make the request to our audience list endpoint and sending the body object { email_address, status: "subscribed" } to ensure the user is subscribed. Then we will await the response and handle the response and error and send the results back to our client. To make sure the serverMiddleware function is working you will have to restart your nuxt development server. Also, because we are using serverMiddleware you will not be able to use nuxt in generate mode since we need a server to run our proxy request to Mailchimp.
Putting It All Together
With our MailchimpSignup.vue component in place we are able to include that anywhere in our project, making sure to wrap it in <client-only> component. Now when our user submits the form we will send a request to our serverMiddleware and using the mailchimp-api-v3 library we are able to subscribe the user to the audience in our Mailchimp account! You could continue to build out other routes to handle unsubscribing or doing anything that the Mailchimp API provides access to, but hopefully this is just the start of your integration. Until next time, stay curious, stay creative.