Nuxt Authentication Auth0 Provider Management API
April 3rd 2020
In this tutorial we are going to discuss how to use Auth0 identity provider service as a Nuxt authentication provider and extend the auth0 library to use the Management API to get roles and permissions for a user.
Nuxt provides an auth module out of the box which provides some basic auth services for us. It’s great library and even has provider strategies for third party providers such as Facebook, Gitbub, Google and Auth0. The auth0 strategy provided does a good job of handling the basic authentication for us to authenticate a user, but what if we want to implement user roles and permissions into our application? The Nuxt auth module provides the basic authentication object for users through the Authentication API but does not provide the Auth0 User Metadata which is accessible via the Management API. The User Metadata is where you can store additional user information such as plans/subscriptions, security roles and permissions.
App metadata: stores information (such as, support plan subscriptions, security roles, or access control groups) that can impact a user’s core functionality, such as how an application functions or what the user can access. Data stored in
https://auth0.com/docsapp_metadatacannot be edited by users.
We can use App metadata to store user roles and permissions in our Nuxt application, but how do we go about getting each user’s app metadata? We can do this through the Management API but in order to access the management api we to obtain a special access token called Auth0 Management API Token. This token will then allow us to access the Management API to get a logged in user’s app_metadata information in which we are storing the user’s roles and permissions.
Creating auth0 Account and Application Setup
We will need an auth0 account since we are using the auth0 identity provider for Nuxt. We can create a free account by going to https://auth0.com/ and clicking the “Sign Up” button. Once logged in we will be directed to our Dashboard where we’ll be able to create a new “Application”. We will need to create two different types of applications. Our first will be of type “Single Page Web Application” which we will use in our Nuxt Auth Module configuration and of which gives us access to auth0’s Authentication API for basic authentication. Our second application we create will be of type “Machine to Machine” which is used to access the auth0 Management API.
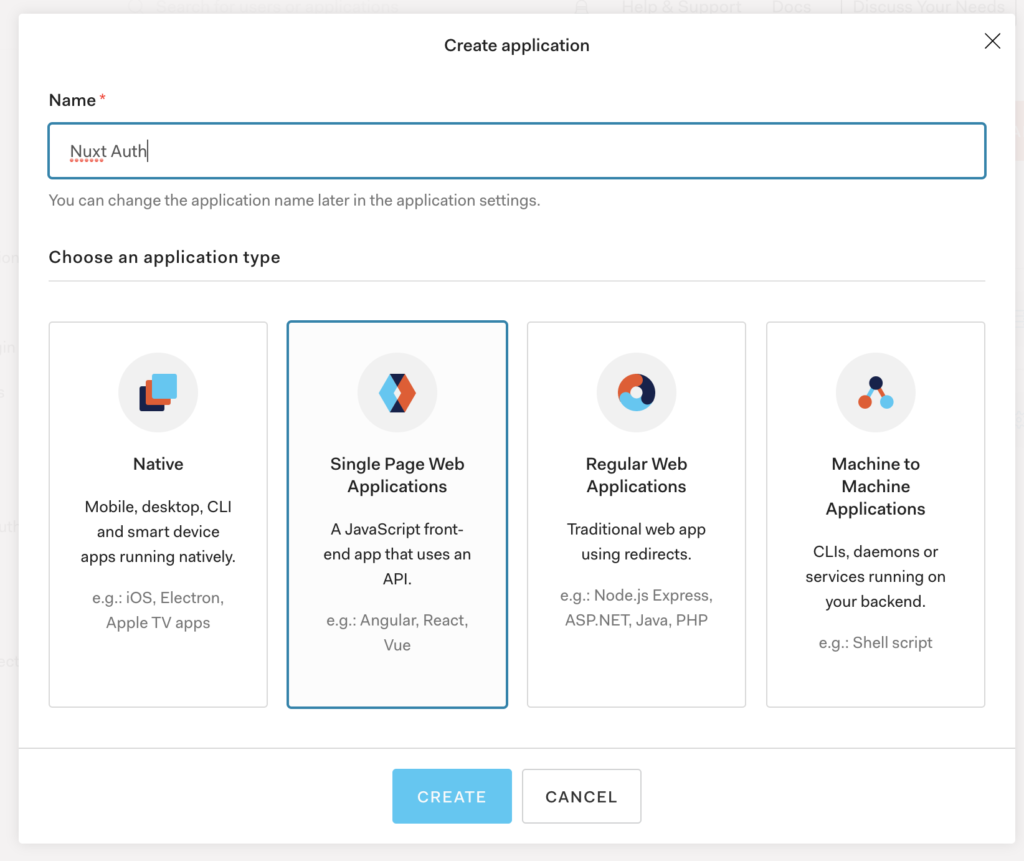
First, we setup our application for the Authentication API that we will use to configure our Nuxt Auth Module. From the “Dashboard” or “Application” tab in you Auth0 account, click on “Create New Application”. For the name we can call it “Nuxt App” and for the application type we can pick “Single Page Web Application”.
Once the app is created you can click on the “Settings” tab for the application and you will want to scroll down to the “Allowed Callback URLs”. We will add our development localhost urls such as: http://localhost:3000/callback which will be the page that is redirected to after authentication from auth0. We will also click on the “Connections” tab and we can enable the Username-Password-Authentication Database connection for this application so our user information is stored in a database on auth0. Finally, we can create our first user by navigating to “Users & Roles” and clicking on sub-tab “Users” and then “Create User” button. Fill out the required information for the user and scroll down to app_metadata field for the user and add:
{
  "role": "administrator"
}
Now we have a user with a “role” defined as “administrator”.
Before we setup our “Machine to Machine” application we will need to define and “API” which we will define in order to access the Management API. Click on the “APIs” tab in the left hand column.
- Go to the API Explorer tab of your Auth0 Management API
- Click the button Create & Authorize a Test Application. A new application has been created and it’s authorized to access the Management API.
The application created in the steps above has been granted all the Management API scopes. This means that it can access all endpoints
https://auth0.com/docs
Now we have our “Machine to Machine” application that will allow us to interface with the Management API in order to get our user’s app_metadata from our application.
With the two applications we have created we can turn our attention to configuring our Nuxt application. For this, we’re going to assume you have a Nuxt.js application installed. If you do not, you can follow the setup instructions: https://nuxtjs.org/guide/installation/
Setting Up Nuxt Auth Module
Our first step will be adding the Nuxt Auth Module to our application and configuring our auth0 provider for the Nuxt Auth module. Let’s install the Nuxt Auth module:
yarn add @nuxtjs/auth
// or
npm install @nuxtjs/auth
Now we can edit our nuxt.config.js and add:
modules: [
  '@nuxtjs/auth'
],
auth: {
  // Options
}
Inside the auth property of our nuxt.config.js file we can define our auth0 provider:
auth: {
  strategies: {
      auth0: {
        domain: 'domain.auth0.com',
        client_id: 'xxxxxxxxxxxxx'
      }
   }
}
You will need to navigate to your “Single Page Application” in Auth0 which we called Nuxt Auth app and copy over the Domain value and Client ID value:
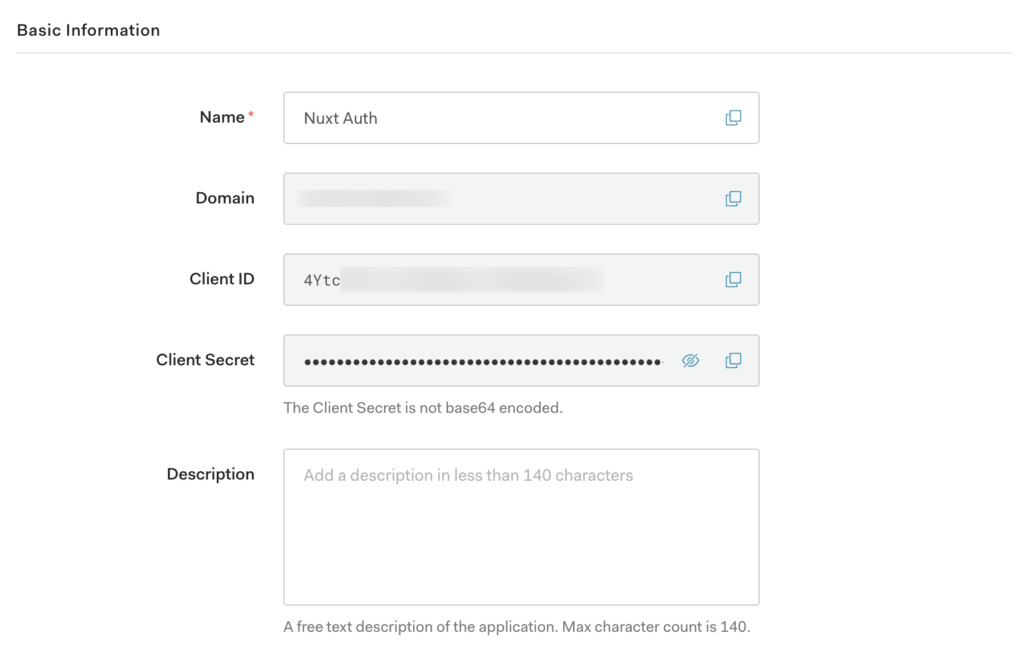
Fill those values in under the auth0 strategy in our nuxt.config.js file. We also need to define our redirect property to equal the “Allowed Callback URLs” so we can add:
auth: {
  strategies: {
      auth0: {
        domain: 'domain.auth0.com',
        client_id: 'xxxxxxxxxxxxx'
      }
   },
   redirect: {
      callback: '/callback'
   },
}
Now that our Nuxt Auth module is configured we can use the login functionality within our file ./pages/login.vue:
<template>
  <button @click="login">Login</button>
</template>
<script>
export default {
  methods: {
    login() {
      this.$auth.loginWith('auth0')
    }
  }
}
</script>
This will redirect us to the domain.auth0.com to authenticate our users and upon authentication it will redirect us back to our http://localhost:3000/callback which is just a temporary page we can create until the nuxt auth module takes over authentication and redirects us to the 'home' key defined in redirect property in nuxt.config.js. Once we are logged in we will have a value in our vuex state that will look like:
{
  auth: {
    user: {
     "sub":"auth0|5add0a735fb3bc1b6xxxxx",
     "nickname":"troy",
     "name":"[email protected]",
     "updated_at":"2020-04-02T14:07:33.221Z",
     "email":"[email protected]",
     "email_verified":true
    }
  }
}
We are verified and we have our auth.user object filled in our Vuex store, but we are missing our user’s app_metadata as that is not returned through the Authentication API (though the endpoint call https://domain.auth0.com/userinfo), but rather the Management API. So how do we make a call to the Management API to receive the user’s app_metadata? We will have to make a “Machine to Machine” connection and use the second auth0 application that we setup to make a call to the Management API endpoint to read user’s app_metadata. We are going to do this by using an Nuxt Auth module’s plugin extension option to write a plugin that will proxy the call to our Nuxt serverMiddleware and in-turn make the call to the Management API.
Let’s start with the Nuxt Auth plugin. We can create a file in our project directory located at ./plugins/appmetadata.js. This file will look like:
import axios from 'axios'
export default async function ({ app: { $auth } }) {
  if (!$auth.loggedIn) {
    return
  }
  const { email } = $auth.$storage.getUniversal('user')
  const appMetaData = $auth.$storage.getUniversal('appMetaData')
  if(!appMetaData) {
    try{
      const { data } = await axios.post(`/api/management`, { email })
      $auth.$storage.setUniversal('appMetaData', data, false)
    }catch(err){
      console.log(err)
    }
  }
}
First, we are importing the axios module so we can use that to create a post request to our serverMiddleware endpoint at /api/management (which we’ll create in a bit). Then we are defining our plugin functionality and checking if the user is logged in with if(!$auth.loggedIn). If the user is not logged in we do not want to make a request to get a users app_metadata since there would be no user in our auth0 account to check against. We are using the $auth.$storage.getUniversal('user') to get the user and destructure the user’s object to obtain the email. We will use the email address in our proxy request to get the user’s app_metadata. Our final check is to make sure that the appMetaData isn’t already set (so we can eliminate an API request to auth0 if we already have the user’s appMetaData stored). Finally, we’re making out axios.post call to our serverMiddleware endpoint and we’re passing in the user’s email as post data to the request.
Before we forget, we need to add this plugin file to our nuxt.config.js auth definition:
auth: {
  plugins: [
    '~/plugins/appmetadata.js'
  ],
  strategies: {
      auth0: {
        domain: 'domain.auth0.com',
        client_id: 'xxxxxxxxxxxxx'
      }
   },
   redirect: {
      callback: '/callback'
   },
}
serverMiddleware to Proxy Request to Auth0
We will need to create a serverMiddleware function to handle our request from the appmetadata.js plugin and proxy the request to our Management API for auth0. You might be wondering “Why can’t I just make the call from the appmetadata.js file to the auth0 management api?” Remember we created the app for “Machine to Machine” in our auth0 account for our Management API because this is a safer way to make requests to the API:
This document describes the Auth0 Management API, which is meant to be used by back-end servers or trusted parties performing administrative tasks. Generally speaking, anything that can be done through the Auth0 dashboard (and more) can also be done through this API.
https://auth0.com/docs/api/management/v2
We will start by creating a file located at ./api/management.js which will become a serverMiddleware express app that we can access with a request to http://localhost:3000/api/management. Let’s start by defining some module requirements for our file:
import express from 'express'
import axios from 'axios'
const app = express()
app.use(express.json())

const clientId = process.env.AUTH0_CLIENT_ID
const clientSecret = process.env.AUTH0_CLIENT_SECRET


export default {
  path: '/api/management',
  handler: app
}
We are using the dotenv() library and we’re creating two environment variables in our .env file:
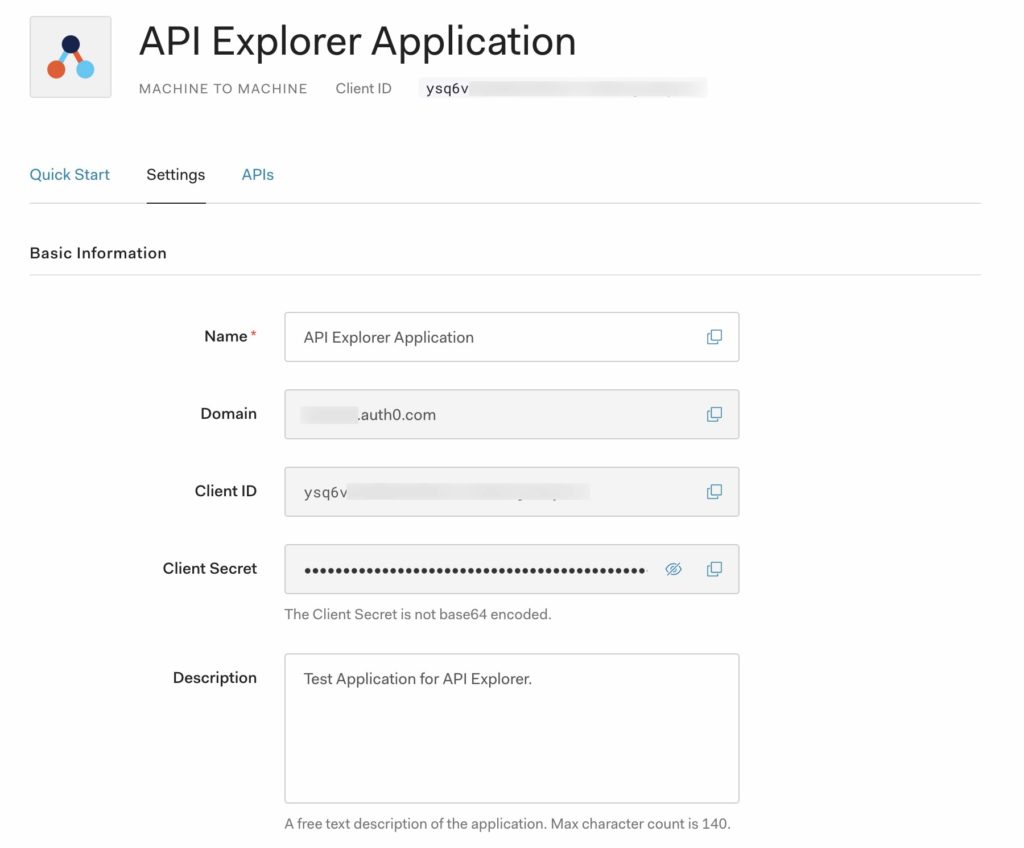
AUTH0_CLIENT_ID="ysq6vu9V3GzpY9OTxxxxxxxxxxxx"
AUTH0_CLIENT_SECRET="Stx8HQ-8pwyDx6YqOkIdyf4tZRgMQm46sf5xxxxxxxxxxxxx"
You can find these credentials in your auth0 dashboard under the “Machine to Machine” Application settings:
We are also exporting our default object which defines the endpoint that we will use under the path: '/api/management'. With the two process variables defined we can start defining our express post route:
import express from 'express'
import axios from 'axios'
const app = express()
app.use(express.json())

const clientId = process.env.AUTH0_CLIENT_ID
const clientSecret = process.env.AUTH0_CLIENT_SECRET

app.post('/', async (req, res, next) => {
  const { body: { email } } = req
})

export default {
  path: '/api/management',
  handler: app
}
We are first getting the email variable from the post body request (which we’re sending with our client request in appmetadata.js file). Now we will need to obtain a “short lived” access_token to be used in our Management API call. We are going to do this use Client Credentials Grant for Auth0 Access Tokens.
Client Credentials Access Token is used for non interactive applications (a CLI, a daemon, or a Service running on your backend) where the token is issued to the application itself, instead of an end user.
https://auth0.com/docs/api-auth/tutorials/client-credentials
Let’s continue defining our middleware post route definition by making a request for an access_token with our client credentials grant type
import express from 'express'
import axios from 'axios'
const app = express()
app.use(express.json())

const clientId = process.env.AUTH0_CLIENT_ID
const clientSecret = process.env.AUTH0_CLIENT_SECRET

app.post('/', async (req, res, next) => {
  const { body: { email } } = req

  try{
    const { data: { access_token, token_type } } = await axios.post('https://flourish.auth0.com/oauth/token', {
      grant_type: 'client_credentials',
      client_id: clientId,
      client_secret: clientSecret,
      audience: 'https://flourish.auth0.com/api/v2/'
    })

    console.log(access_token, token_type)
    res.end()
  }catch(err){
    console.log(err)
    next(err)
  }

})

export default {
  path: '/api/management',
  handler: app
}
Now that we have a “shorted lived” access token for our Management API we can finally make a request call to the Management API to get the user’s app_metadata information and send that back to our client to set in our vuex store. We are going to get our user using the Management API users endpoint. It will look like:
import express from 'express'
import axios from 'axios'
const app = express()
app.use(express.json())

const clientId = process.env.AUTH0_CLIENT_ID
const clientSecret = process.env.AUTH0_CLIENT_SECRET

app.post('/', async (req, res, next) => {
  const { body: { email } } = req

  try{
    const { data: { access_token, token_type } } = await axios.post('https://flourish.auth0.com/oauth/token', {
      grant_type: 'client_credentials',
      client_id: clientId,
      client_secret: clientSecret,
      audience: 'https://flourish.auth0.com/api/v2/'
    })

    try{
      const { data: [{ app_metadata: appMetaData }] } = await axios.get(`https://domain.auth0.com/api/v2/users?q=email:"${email}"&search_engine=v3`, {
        headers: {
          "Authorization": `${token_type} ${access_token}`
        }
      })
      res.json(appMetaData)
    }catch(err){
      console.log(err)
      next(err)
    }

  }catch(err){
    console.log(err)
    next(err)
  }

})

export default {
  path: '/api/management',
  handler: app
}
We are using axios to to hit the endpoint https://domain.auth0.com/api/v2/users?q=email:"${email}"&search_engine=v3 make sure you are replacing the domain.auth0.com with your application’s domain name. We are using the query parameter search_engine=v3 and sending the user’s email address to search by (since that is unique to each user). We are using the access_token we obtained in the client credentials request to set our “Authorization” header in our axios request. When the request is returned we are destructuring to the get the user’s app_metadata and we’re storing it in an object appMetaData and using res.json(appMetadata) to return the user’s app_metadata to the client side to be stored.
With our serverMiddleware api endpoint defined we can add the serverMiddleware file to our nuxt.config.js file:
module.exports {
  ...
  serverMiddleware: [
    '~/api/management'
  ],
  ...
}
Now when we restart our development server we’re able to hit our endpoint at: http://localhost:3000/api/management.
Using appMetaData For Checking Permissions In Nuxt Middleware
Nuxt Middleware (not to be confused with serverMiddleware) is a function defined that will be called before route changes (both on server and client in universal mode) which we can use to check our permissions.
Middleware lets you define custom functions that can be run before rendering either a page or a group of pages.
https://nuxtjs.org/guide/routing#middleware
Imagine we have a page that we want only user’s with role: administrator to access. Let’s say this page is located at ./pages/admin.vue we will need to define our middleware property in the page export to check our permissions. We can actually add two middleware definitions. The first is Nuxt Auth Module 'auth' middleware definition and the next is our 'permissions' middleware file (which we will define in a bit). In ./pages/admin.vue we can define:
<template>
  <div>
    <h1>Only accessible by logged in user's with role: administrator</h1>
  </div>
</template>
<script>
export default{
  middleware: ['auth', 'permissions']
}
</script>
Now with that defined we can create a file located at ./middleware/permissions.js which would look like:
export default function({app, redirect}){
  if(app.$auth.loggedIn){
    const appMetaData = app.$auth.$storage.getUniversal('appMetaData')
    if(appMetaData.role !== "administrator"){
      return redirect('/')
    }
  }
}
We are double checking the user is logged in using app.$auth.loggedIn and then we are using the Nuxt Auth Module Storage $storage API to get the appMetaData we set before in our appmetadata.js plugin. We are making sure that the appMetaData.role is equal to “administrator” and if not we are redirecting the user to the homepage (you can redirect to login or whatever page you would like). Now if you login by navigating to http://localhost:3000/login you can login using the user we setup in the auth0 dashboard and when you are returned to the site you should be able to successfully navigate to http://localhost:3000/admin page!
Recap Nuxt Auth Module Provider Auth0
We have successfully used the Auth0 Provider defined in our Nuxt Auth Module to call the Management API to get and set a user’s app_metadata information in our application. This is used for data that the user has read-only access to (e.g. roles, permissions, vip, etc). To review we had to:
- Install and Configure our Nuxt Auth Module
- Create Two Applications in the Auth0 Dashboard
- Create a Nuxt Auth Module Plugin to Proxy a Request to serverMiddleware
- Define serverMiddleware that makes a “Machine to Machine” call to Auth0 Management API
- Create a
permissions.jsmiddleware function that check’s a user’sappMetadata.roleand set a protected route athttp://localhost:3000/admin
Hopefully this tutorial helps understand the inner-workings of the Nuxt Auth Module and using the Auth0 Provider for authentication and permission based user management. Until next time, stay curious, stay creative!