Netlify Form Notification SMS Text Message
April 25th 2020
Wouldn’t it be cool if you received your Netlify contact form submissions to your cell phone, notifying you of a hot lead? This type of push notification relieves you of hanging around your email all day, afraid of losing a lead to a competitor.
Research found the odds of making a successful contact with a lead are 100 times greater when a contact attempt occurs within 5 minutes, compared to 30 minutes after the lead was submitted. Similarly, the odds of the lead entering the sales process, or becoming qualified, are 21 times greater when contacted within 5 minutes versus 30 minutes after the lead was submitted.
Hubspot
Thankfully, there are tools out there that we can configure and use for sending SMS messages to our phone(s) when receiving a form notification.
Overview
In this tutorial we will be:
- Setting up a Twilio phone number in order to use the twilio api to send out SMS messages.
- Using Netlify Functions to deploy our lambda function that will expose an endpoint for our webhook.
- Configure our Netlify form to send out a webhook notification to our webhook which will call our endpoint passing the form data.
Even though we are sending out an SMS message, we can use a lot of the same techniques in this tutorial to automate our form notifications such as: adding a contact into a CRM system, subscribing a user to a list, creating a support ticket and more.
Twilio Phone Number Setup
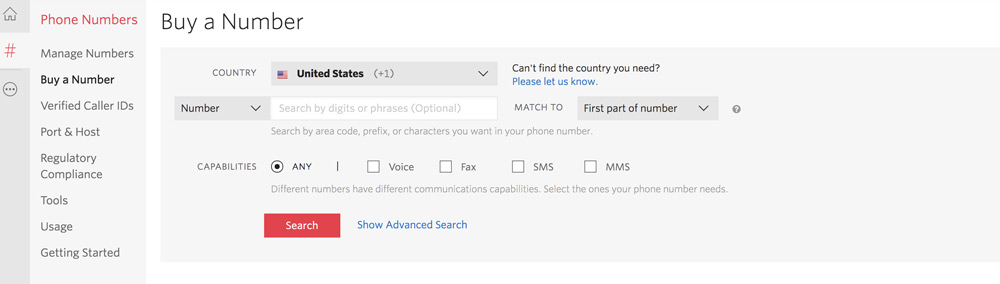
In order to send out SMS messages we’ll need a communication provider that supports sending out SMS messages. In this tutorial we’ll setup a twilio account and a phone number in order to send out our text messages. If you use this tutorial to send automated text response messages, it is nice to get local number(s) in order to create consumer confidence between you and your new contact. First, we’ll need to head over to Twilio to create an account (if you don’t have one already). Once we are logged into the twilio dashboard we can navigate to our Phone Numbers page. We can create a new number and search for the number you want (using an area code that is close to your customer’s area code) making sure that the number you select has SMS capabilities:
Once we have our twilio number setup we are able to turn our attention to our Netlify Function to deploy our lambda function which exposes an endpoint for our webhook notification.
Netlify Function Setup
Netlify offers AWS lambda functions as a service to our deployed sites. Since Netlify sites are “serverless” lambda functions allow us to create micro services to handle server side functionality, such as communicating with the Twilio API. In order to get started we will need to create a folder in our project’s root directory which will contain our files that define our endpoint functions. In your website’s project directory create a folder called lambda and inside the folder we can create a file called sms.js which will define our function. Before we start writing our lambda function we need to tell Netlify that we have a “Functions” folder and define the path to the folder. We can login to our Netlify console, select the netlify site that you are going to deploy your function under, you can navigate to “Settings” tab, and finally in the left hand sidebar click on the Functions > Settings:
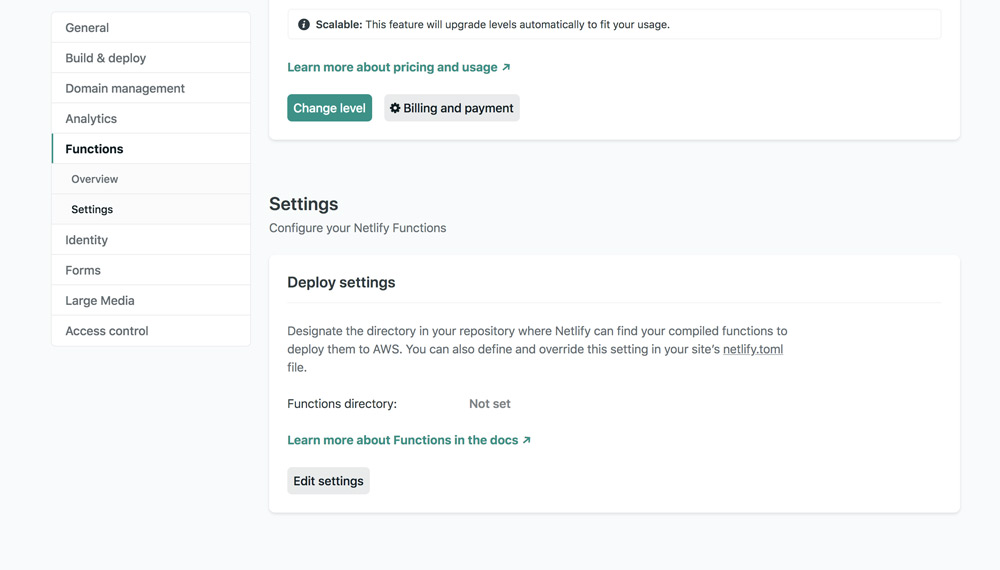
We can click on “Edit settings” and set the path to our Functions directory to lambda/. Now Netlify knows that we want to compile the files in our lambda/ folder into Netlify Functions. Let’s take a look at our sms.js file that we created in the lambda folder of our project root to see how we can use the Twilio API to send a contact message to our phone.
Creating Netlify Lambda Function
We have setup our Twilio number, created a folder in our project directory called lambda and configured the deploy settings for our Functions directory in our Netlify account. Now we can create our function that will be inside our sms.js file inside our lambda folder. What we will need for this function to create our endpoint is the following:
- Installation of the
twilionode library - Our Twilio Account SID & Auth Token
- Create environment variables on our Netlify account to hold Account SID & Auth Token
First we’ll start by downloading the twilio node library as a dependency in our project directory. We can do this with our node package manager of choice:
yarn add twilio
//or
npm install twilio
Since twilio is installed as a package in our projects root directory, the Netlify Zip It and Ship It module which handles zipping up lambda functions with their dependencies before deployment. This module will traverse up the project tree until it finds the node_modules folder with the dependency for the lambda function and include the package dependency with our function before it’s deployed.
Getting the Twilio Account SID and Auth Token
We can obtain the Twilio Account SID and Auth Token from our twilio console. On our main dashboard page you will see the fields for the Account SID and the Auth Token:
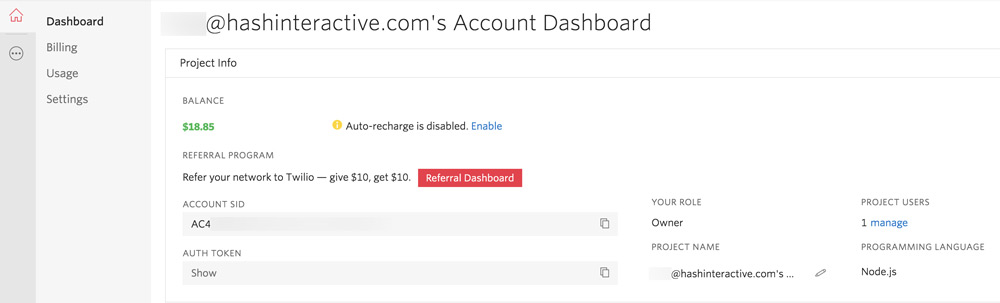
We can copy these values and head on over to our Netlify site that we will be deploying and navigate to our project Settings > Build & Deploy > Environment and we can add two environment variables: TWILIO_AUTH_TOKEN and TWILIO_ACCOUNT_SID making sure we copy the correct values from our Twilio Dashboard. Now these environment variables will be available in our sms.js file through process.env.TWILIO_AUTH_TOKEN and process.env.TWILIO_ACCOUNT_SID. Speaking of our sms.js file let’s turn our attention to finishing up our lambda function to send the sms text message.
Lamda Function to Send Text Message
We will be creating our function which will be invoked when our Netlify form is submitted and triggers our Netlify webhook. Our function will receive an event argument which contains the POST request data sent from our contact form webhook.
When you call a serverless function’s endpoint, the
https://docs.netlify.com/functions/build-with-javascript/#formathandlerreceives aneventobject similar to what you would receive from the AWS API Gateway:
We can use the event.body and destructure the data from it to use to send our sms text message. We’ll assume that your Netlify form only has three fields (but you can always add more) name, email and message. Let’s take a look at what our full sms.js file would look like:
exports.handler = function(event, context, callback) {
  // get the environment variables set in Netlify Dashboard
  const { TWILIO_AUTH_TOKEN: authToken, TWILIO_ACCOUNT_SID: accountSid } = process.env
  // require twilio and create a twilio client instance
  const client = require('twilio')(accountSid, authToken);
  // parse and destructure our form data sent by webhook
  const { data } = JSON.parse(event.body)
  const { name = '', email = '', message = '' } = data
  // construct the sms text message body
  const sms = `Contact Form Message\nFrom: ${name} <${email}>\nMessage: ${message}`

  // use twilio client to send message to specified number
  client.messages
      .create({body: sms, from: '+15559870000', to: '+13339871234'})
      .then(msg => callback(null, {
        statusCode: 200,
        body: msg.sid
      }))
      .catch(err => console.log(err));
}
First, we’re getting the two environment variables we set in our dashboard the TWILIO_AUTH_TOKEN and the TWILIO_ACCOUNT_SID. Secondly, we’re requiring the twilio node package and creating a client instance by passing in our environment variables we defined. Next, we’re destructuring the data from our webhook POST body request so we have the information from our Netlify form that is submitted. We are constructing the sms text message body with the data we received. Finally, we’re using the client instance we created to send the text message to our number(s) of choice. You will want to replace the from number with the Twilio number you setup at the beginning of the tutorial. Now we can deploy our site to Netlify and during the build process the lambda function will be generated with a unique endpoint such as: https://example.com/.netlify/functions/sms. You can find the endpoint by going to your Netlify dashboard for your site and clicking on Functions tab and select the function that we created which we called sms as it’s based on our sms.js filename. Now we can navigate over to our Netlify Forms by going to Settings > Forms > Form notifications. We can add a notification of type “Outgoing webhook” and under the field URL to notify we can paste in our sms function endpoint we copied.
Testing and Wrapping Up
We should now be able to go to our website and select the form that you configured for your Outgoing Webhook notification in the last step. Fill out the fields and submit the form! You should see a notification to the number you specified in the lambda function. How cool is that? Now every time you get a form submitted you will receive the message to your phone number of choice via a sms text message. Until next time, stay curious, stay creative.