Complete Guide to Webpack Configuration for React
June 10th 2020
Webpack Config for React Including Babel Presets, Webpack Dev Server, Hot Module Replacement, MiniCssExtractPlugin, PostCSS and Eslint Autofix
If you are creating a react application it’s quick and easy to jump to using the create react app (CRA) provided by the React development team. But what if you need to customize the webpack configuration to include other pre or post processing loaders for your application? The CRA provides a lot of webpack utilities for you but sometime you need to create (and understand) your own webpack configuration.
In this tutorial we’ll look at various webpack configuration options for you React application including:
- Configuring Babel Presets for JavaScript Compiling for React
- Configuring Webpack Dev Server and Hot Module Replacement
- Configuring MiniCssExtractPlugin to write CSS Files
- Adding PostCSS and PostCSS plugins to your Webpack Config
- Adding ESLint to your JavaScript and JSX files for React
Project Setup and Dependencies
Let’s start off by creating our folder structure for our React project. We can first create a project folder called react-webpack-config and change into the directory. We can make sure that we can use a dependency manager like npm by initializing a package.json by executing: npm init -y
Since this is a react application we’ll need to install some react dependencies:
npm i react react-domWe can also create our folder structure and add some required files that we will need for our project. First, in our project directory create a dist folder which will hold all of our webpack compiled scripts and our main entry javascript file for our react application along with css files that we will be adding. Inside dist folder we can create a index.html file as well as a bundle.js file which will be our webpack bundled and compiled JavaScript.
We will also be creating a src folder inside our project root directory that will hold our JavaScript and JSX files for our React application. Inside our src folder we can create a index.js file which will be the entry point for our React app. We can also create a sub directory called components which will hold our react components. With those files in place we can turn our attention to our Webpack setup.
Initial Webpack Config for React
Initially we’ll just be focusing on creating a simple react app with the least amount of dependencies to get the react app working. To do that we’ll need to use Webpack for doing our heavy lifting to compile our JavaScript files. Since we’re using Webpack we’ll need to install the webpack node module and webpack-cli since we’ll be running the development server. We can install webpack as a dependency:
npm i webpack webpack-cliWith babel installed we can start configuring our webpack to use the babel-loader to compile our react javascript files and jsx files.
in your project folder create a file called webpack.config.js and inside we’ll define some configuration options:
const path = require('path')

module.exports = {
  entry: path.resolve(__dirname, 'src', 'index.js'),
  output: {
    path: path.resolve(__dirname, 'dist'),
    filename: 'bundle.js'
  }
}
Our first option in our exports object is our entry path definition which is the file to our index.js file in our src directory which will be the react app entry point.
The second property in our exports object is our output object. This defines the location and name of the bundled file for our webpack build. We are expecting the file to be located at ./dist/bundle.js. Now that we have a basic configuration we can return to our entry file to add some JavaScript that will be compiled for us at build time. Let’s open our ./src/index.js file and add an immediate invoked function expression:
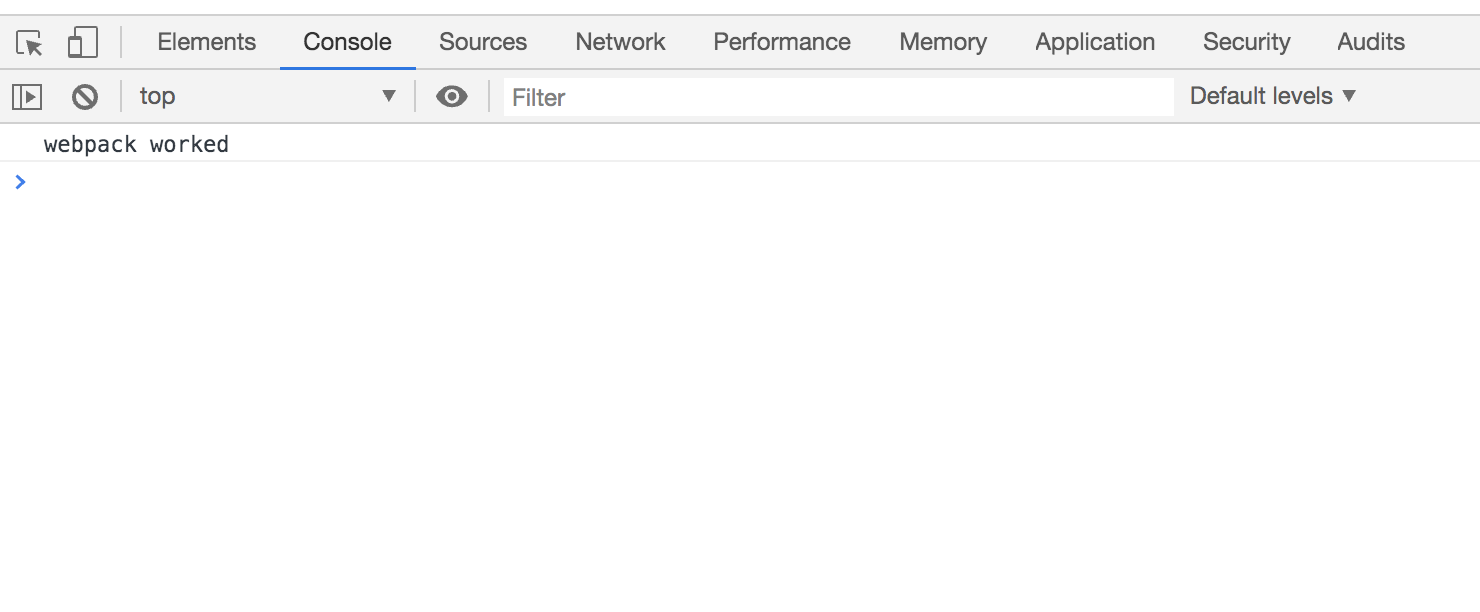
(() => {
  console.log('webpack worked')
})()
Now to make sure that our webpack config is working so far we can run the npx webpack config:
npx webpack --config webpack.config.jsOnce we run this we should see in the console our webpack build:
Version: webpack 4.43.0
Time: 206ms
Built at: 06/08/2020 9:46:29 PM
Asset       Size  Chunks             Chunk Names
bundle.js  959 bytes       0  [emitted]  main
Entrypoint main = bundle.js
[0] ./src/index.js 45 bytes {0} [built]
And if we open up our bundle.js file we can see that there is bundled code written to our output file. Just to make sure everything is working we can edit our index.html file and include our bundle script such that:
<!DOCTYPE html>
<html>

<head>
  <meta charset="utf-8">
  <title>Complete React Webpack Configuration</title>
  <meta name="viewport" content="width=device-width,initial-scale=1">
</head>

<body>
  <div id="app"></div>
  <script src="./bundle.js" async defer></script>
</body>

</html>
Now if we open the index.html file in our web browser (with or without a web server) our function in our entry file is run and our console.log function is logged to the console:
Webpack Babel Loader and Babel Presets for React
Now that the basic Webpack configuration is working with our entry and output properties defined we can install our babel dependencies:
npm i @babel/core @babel/preset-env @babel/preset-react babel-loaderThese babel packages will help us transform our ECMAScript and JSX files in our React application into browser friendly, compatible Javascript. To use these dependencies inside our webpack configuration we’ll need to define a module property inside our webpack exports object. The module property is an array of rules objects that will test a conditional for our files to see if the a webpack loaders should be applied to the output, or modify the webpack parser. Each rule can have a test property that tests if a file should be acted upon by webpack. In our case we’ll want to test JavaScript files and JSX files and use the babel-loader with some configuration options to compile our javascript into browser friendly javascript files.
const path = require('path')

module.exports = {
  entry: path.resolve(__dirname, 'src', 'index.js'),
  output: {
    path: path.resolve(__dirname, 'dist'),
    filename: 'bundle.js'
  },
  module: {
    rules: [
      {
        test: /\.(jsx|js)$/,
        include: path.resolve(__dirname, 'src'),
        exclude: /node_modules/,
        use: [{
          loader: 'babel-loader',
          options: {
            presets: [
              ['@babel/preset-env', {
                "targets": "defaults"
              }],
              '@babel/preset-react'
            ]
          }
        }]
      }
    ]
  }
}
There is a lot going on in our first webpack module rule so let’s break it down. As mentioned the test property tests the file extension to see if we should use the babel-loader. We are including all files in our project src folder and just in case there are any node package dependencies in that src folder we’re use the exclude regular expression to exclude any files within a node_modules sub folder. The use is the loader that we want to use on these files and we are going to be using babel-loader which takes some options. Remember, we installed some presets: @babel/preset-env and @babel/preset-react.
The @babel/preset-env is used to check compatibility for backward compatibility and polyfills for commonly used browser versions. The targets property targets a browserslist query for compatible browser versions. The "default" option is the save as using the query string '> 0.5%, last 2 versions, Firefox ESR, not dead' . If we want to run a quick test for browser version we can run:
npx browserslist 'defaults'We should see the list of browsers:
and_chr 81
and_ff 68
and_qq 10.4
and_uc 12.12
android 81
baidu 7.12
chrome 83
chrome 81
chrome 80
edge 83
edge 81
edge 18
firefox 76
firefox 75
firefox 68
ie 11
ios_saf 13.4-13.5
ios_saf 13.3
ios_saf 12.2-12.4
kaios 2.5
op_mini all
op_mob 46
opera 68
opera 67
safari 13.1
safari 13
samsung 11.1
samsung 10.1
This covers 99% of browsers that are being used so we can ensure that our React code is compiled into compatible JavaScript for these browsers.
Finally, the @babel/preset-react handles JSX syntax that we will be writing in our React app. With our webpack babel-loader configured we can write some React application logic to test to make sure our React application is getting compiled properly.
Inside, our src/index.js file we can import React library and ReactDOM:
import React from 'react'
import ReactDOM from 'react-dom'

ReactDOM.render(
  React.createElement('div', null, `Hello React`),
  document.getElementById('app')
)
Here we are creating a react element using React.createElement() function which is a div with the text "Hello React" and we are rendering it to our <div id="app"></div> which is found inside our index.html file. With this in place we can run our npx webpack command again to see if our bundle.js is compiled correctly:
npx webpack --config webpack.config.jsOnce our webpack is done compiling we can open our index.html file with our browser an we should see "Hello React" in the web browser:
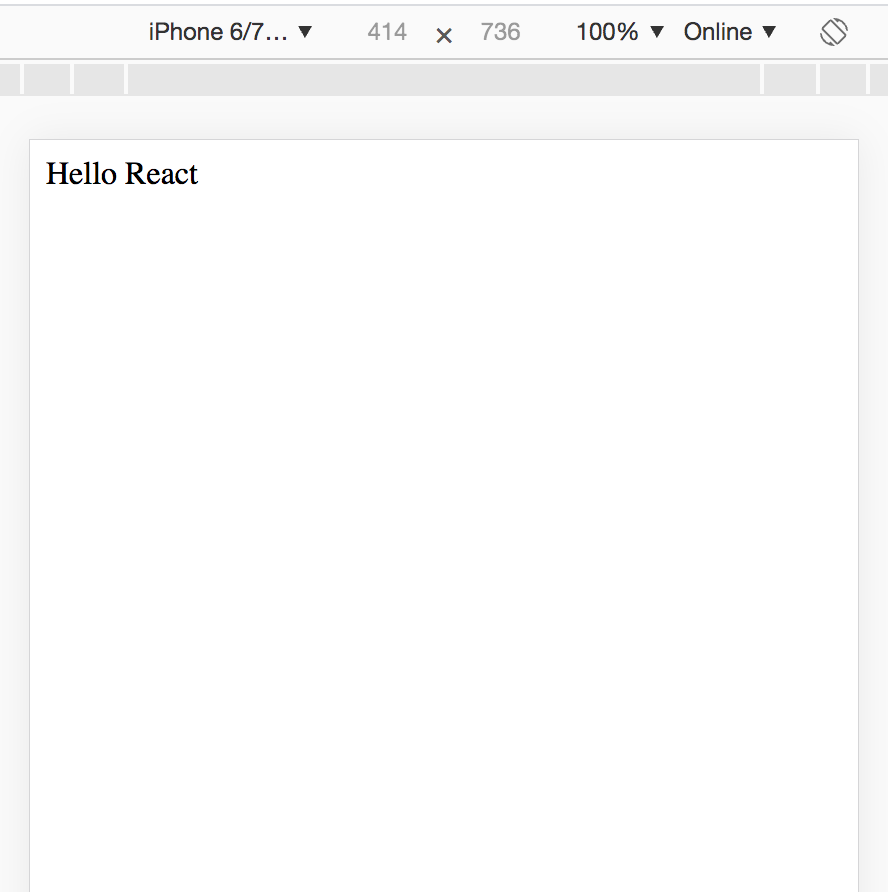
Hooray! This works. We’ve successfully compiled our React JavaScript to browser compatible browser JavaScript. Running the command npx webpack --config webpack.config.js every time we edit our React application can get a bit annoying. Let’s create a npm script that runs a webpack dev server for us so our webpack can auto compile for us on file changes!
Configuring Webpack Dev Server and Hot Module Replacement
The webpack-dev-server package is a development dependency that can streamline the development process for our React app. Remember, every time we make a change to our React application we need to recompile our bundle.js file. Fortunately, the webpack-dev-server can do this for us by watching for file changes. It can also server our index.html file in our dist directory as a web server instead of from a file:// resource that we’ve been loading it with. This is critical in cross origin requests (CORs) and loading resources/assets for our application. We can add webpack-dev-server package as a development dependency in our application:
npm i webpack-dev-server --save-devWith the webpack-dev-server installed we can add a devServer property to our webpack.config.js exports object:
const path = require('path')

module.exports = {
  entry: path.resolve(__dirname, 'src', 'index.js'),
  output: {
    path: path.resolve(__dirname, 'dist'),
    filename: 'bundle.js'
  },
  devServer: {
    contentBase: path.resolve(__dirname, 'dist'),
    open: true,
    clientLogLevel: 'silent',
    port: 9000
  },
  module: {
    rules: [
      {
        test: /\.(jsx|js)$/,
        include: path.resolve(__dirname, 'src'),
        exclude: /node_modules/,
        use: [{
          loader: 'babel-loader',
          options: {
            presets: [
              ['@babel/preset-env', {
                "targets": "defaults"
              }],
              '@babel/preset-react'
            ]
          }
        }]
      }
    ]
  }
}
Our devServer property will take a couple of options. First, the contentBase is the path to our output directory dist where our index.html and bundle.js file are found. This is going to be the base where our devServer serves the files. By default, any index.html file will be served as is the case with any other web server. The open property tells the devServer to open a browser window for the application. The clientLogLevel is set to silent so all server requests and long pull requests will not be logged to the console. Finally, we are going to run the server on the port 9000 so our full development url will be http://localhost:9000. We can start the devServer by setting up a node startup script in our package.json file:
{
  "name": "react-webpack-config",
  "version": "1.0.0",
  "description": "",
  "main": "index.js",
  "scripts": {
    "develop": "webpack-dev-server",
    "test": "echo \"Error: no test specified\" && exit 1"
  },
  //...
}
Finally, we can start our development server by running npm run develop in our project’s root directory. You should see a new browser window pop open with our “Hello React” text.
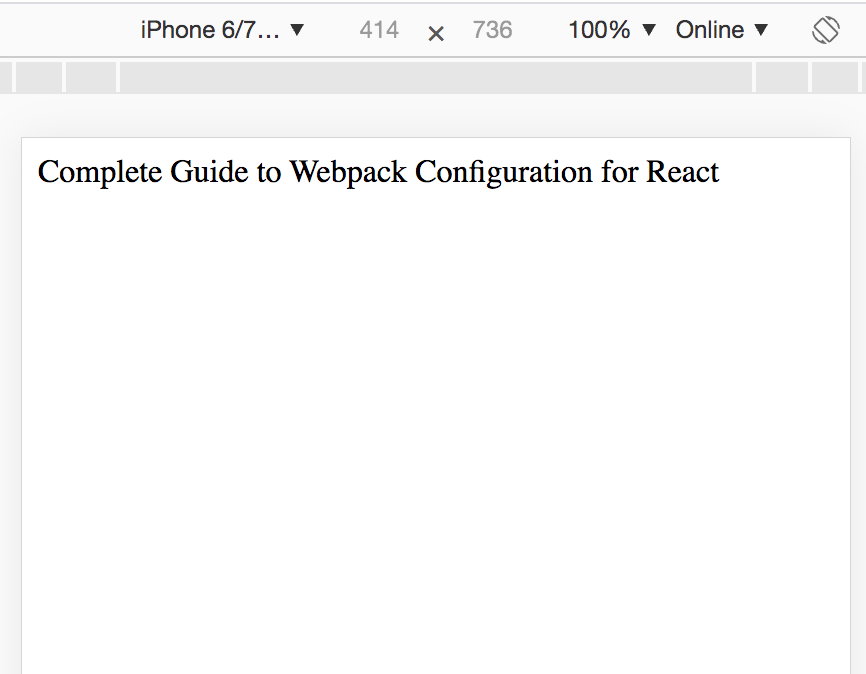
This is working great. And if we changes a file in our React application the devServer will refresh our browser with the changes presented. Let’s change our text in our src/index.js file:
import React from 'react'
import ReactDOM from 'react-dom'

ReactDOM.render(
  React.createElement('div', null, `Complete Guide to Webpack Configuration for React`),
  document.getElementById('app')
)
We should see our changes automatically pick up in the browser:
Let’s say that we want to make some CSS edits in the browser and after we make those edits we go back into our React app and make changes to our app files. Would the CSS changes persist? As of now our devServer would complete a full page refresh and we would lose our CSS changes and/or our application state (since state is stored in memory). We can change that by setting Hot Module Replacement to only replace the parts of our app that was edited.
Webpack Dev Server Hot Module Replacement (HMR)
Hot Module Replacement (HMR) exchanges, adds, or removes modules while an application is running, without a full reload. This can significantly speed up development in a few ways:
– Retain application state which is lost during a full reload.
– Save valuable development time by only updating what’s changed.
– Instantly update the browser when modifications are made to CSS/JS in the source code, which is almost comparable to changing styles directly in the browser’s dev tools.
https://webpack.js.org/concepts/hot-module-replacement/
We can use webpack’s internal HotModuleReplacementPlugin to add HMR to our application. First, we’re going to refactor our entry file found at src/index.js to use React JSX and subscribe to HMR:
import React from 'react'
import ReactDOM from 'react-dom'
import App from './components/App'

// Opt-in to Webpack hot module replacement
if (module.hot) module.hot.accept()

ReactDOM.render(
  <App />,
  document.getElementById('app')
)
Here we are adding an important line to Opt-in to our Webpack HMR
if (module.hot) module.hot.accept()
We are also creating a new file in src/components/App.js which is basic React JSX for our React App wrapper:
import React from 'react'

const App = ({ props }) => (
  <div>
    Webpack HMR Example
  </div>
)

export default App
Now we can edit our webpack.config.js file to add HMR:
const path = require('path')
const webpack = require('webpack')

module.exports = {
  plugins: [
    new webpack.HotModuleReplacementPlugin()
  ],
  entry: path.resolve(__dirname, 'src', 'index.js'),
  output: {
    path: path.resolve(__dirname, 'dist'),
    filename: 'bundle.js'
  },
  devServer: {
    contentBase: path.resolve(__dirname, 'dist'),
    open: true,
    clientLogLevel: 'silent',
    port: 9000,
    hot: true
  },
  module: {
    rules: [
      {
        test: /\.(jsx|js)$/,
        include: path.resolve(__dirname, 'src'),
        exclude: /node_modules/,
        use: [{
          loader: 'babel-loader',
          options: {
            presets: [
              ['@babel/preset-env', {
                "targets": "defaults"
              }],
              '@babel/preset-react'
            ]
          }
        }]
      }
    ]
  }
}
Note, we are adding a plugins property to our webpack configuration. We’re also adding the hot: true property to our webpack devServer options. We can restart our webpack development server to pick up the configuration changes and we should see our app open in our browser. Let’s test the HMR by opening up the developer console tools and changing the CSS of our body to:
body {
  background: #eeeeee;
}
Now we can go back into our App.js file and make changes to our text:
import React from 'react'

const App = ({ props }) => (
  <div>
    Webpack HMR is Working!
  </div>
)

export default App
We should see the text of our React app replaced without our whole page refreshing and the body background color of our app should be preserved!
Configuring MiniCssExtractPlugin to write CSS Files
It’s common practice to keep your application styles inside CSS files within your application and import those files into your React app. In order to have CSS files in your React app and still maintain the HMR we can use the MiniCssExtractPlugin to do our heavy lifting for us. Let’s install the plugin and set the configuration options for our plugin. We can install the node dependency and also the recommended loader to use with MiniCssExtractPlugin the css-loader. Let’s install these dependencies:
npm i mini-css-extract-plugin css-loaderOnce these dependencies are installed we can make some edits to our webpack configuration to include these utilities in our development process.
const path = require('path')
const webpack = require('webpack')
const MiniCssExtractPlugin = require('mini-css-extract-plugin');

module.exports = env => {
  return {
    plugins: [
      new MiniCssExtractPlugin({
        filename: '[name].bundle.css',
        chunkFilename: '[id].css'
      }),
      new webpack.HotModuleReplacementPlugin()
    ],
    entry: path.resolve(__dirname, 'src', 'index.js'),
    output: {
      path: path.resolve(__dirname, 'dist'),
      filename: 'bundle.js'
    },
    devServer: {
      contentBase: path.resolve(__dirname, 'dist'),
      open: true,
      clientLogLevel: 'silent',
      port: 9000,
      historyApiFallback: true,
      hot: true
    },
    module: {
      rules: [
        {
          test: /\.(jsx|js)$/,
          include: path.resolve(__dirname, 'src'),
          exclude: /node_modules/,
          use: [{
            loader: 'babel-loader',
            options: {
              presets: [
                ['@babel/preset-env', {
                  "targets": "defaults"
                }],
                '@babel/preset-react'
              ]
            }
          }]
        },
        {
          test: /\.css$/i,
          include: path.resolve(__dirname, 'src'),
          exclude: /node_modules/,
          use: [
            {
              loader: MiniCssExtractPlugin.loader,
              options: {
                hmr: env.NODE_ENV === 'development',
              }
            },
            {
              loader: 'css-loader',
              options: {
                importLoaders: 0
              }
            }
          ]
        }
      ]
    }
  }
}
First, we’re turning our module.exports object into a function that is accepting an env variable and returning our webpack config object. We are then adding the MiniCssExtractPlugin to our plugin definitions with some options:
      //...
      new MiniCssExtractPlugin({
        filename: '[name].bundle.css',
        chunkFilename: '[id].css'
      }),
      //...
We’re defining what our filename is going to be which will be rendered as: main.bundle.css
Next, we’re adding another rule in our module.rules array and including the two loaders that we installed MiniCssExtractPlugin.loader and css-loader to handle importing css inside .js files such as import ./index.css
  module: {
    rules: [
      //...
        {
          test: /\.css$/i,
          include: path.resolve(__dirname, 'src'),
          exclude: /node_modules/,
          use: [
            {
              loader: MiniCssExtractPlugin.loader,
              options: {
                hmr: env.NODE_ENV === 'development',
              }
            },
            {
              loader: 'css-loader',
              options: {
                importLoaders: 0
              }
            }
          ]
        }
    ]
  }
Inside our options for our MiniCssExtractPlugin.loader we are setting the hmr property to be truthy based on our env.NODE_ENV variable. Finally, our css-loader we’re passing the importLoaders option which tells css-loader how many loaders to load before it loads. Right now we’ll set it to 0 but when we add our PostCSS loader we will change this to allow the PostCSS to be loaded before our css-loader.
importLoaders
Enables/Disables or setups number of loaders applied before CSS loader.
https://webpack.js.org/loaders/css-loader/#importloaders
The optionimportLoadersallows you to configure how many loaders beforecss-loadershould be applied to@imported resources.
Before we forget we need to add a --env flag to our develop script in our package.json file:
//...
"scripts": {
  "develop": "webpack-dev-server --env.NODE_ENV=development --mode development",
},
//...
This will allow us to access the env variable in our webpack.config.js such as:
env.NODE_ENV === 'development' //evaluates to trueLet’s add a css file to our project to make sure the MiniCssExtractPlugin.loader is working. Inside our src folder create index.css and add:
body {
  background:#eeeeee;
}
Now inside our src/index.js file we can import the css file:
import './index.cssFinally, we’ll need to include our css bundle file main.bundle.css inside our indext.html file in our dist directory:
<!DOCTYPE html>
<html>

<head>
  <meta charset="utf-8">
  <title>Complete React Webpack Configuration</title>
  <link rel="stylesheet" type="text/css" href="/main.bundle.css">
  <meta name="viewport" content="width=device-width,initial-scale=1">
</head>

<body>
  <div id="app"></div>
  <script src="/bundle.js" async defer></script>
</body>

</html>
Now we can restart the server by running npm run develop and upon navigating to our page we should see a lightgray background color!
Adding PostCSS and PostCSS plugins to your Webpack Config
With the MiniCssExtractPlugin installed and configured we can easily add our PostCSS in order to extend the functionality of our css files. First, we’ll need to install the postcss-loader dependency:
npm i postcss-loaderNow inside our webpack.config.js file we can add a loader to our /\.css$/i rule:
//...
{
test: /\.css$/i,
include: path.resolve(__dirname, 'src'),
exclude: /node_modules/,
use: [
{
loader: MiniCssExtractPlugin.loader,
options: {
hmr: env.NODE_ENV === 'development',
}
},
{
loader: 'css-loader',
options: {
importLoaders: 1
}
},
'postcss-loader'
]
}
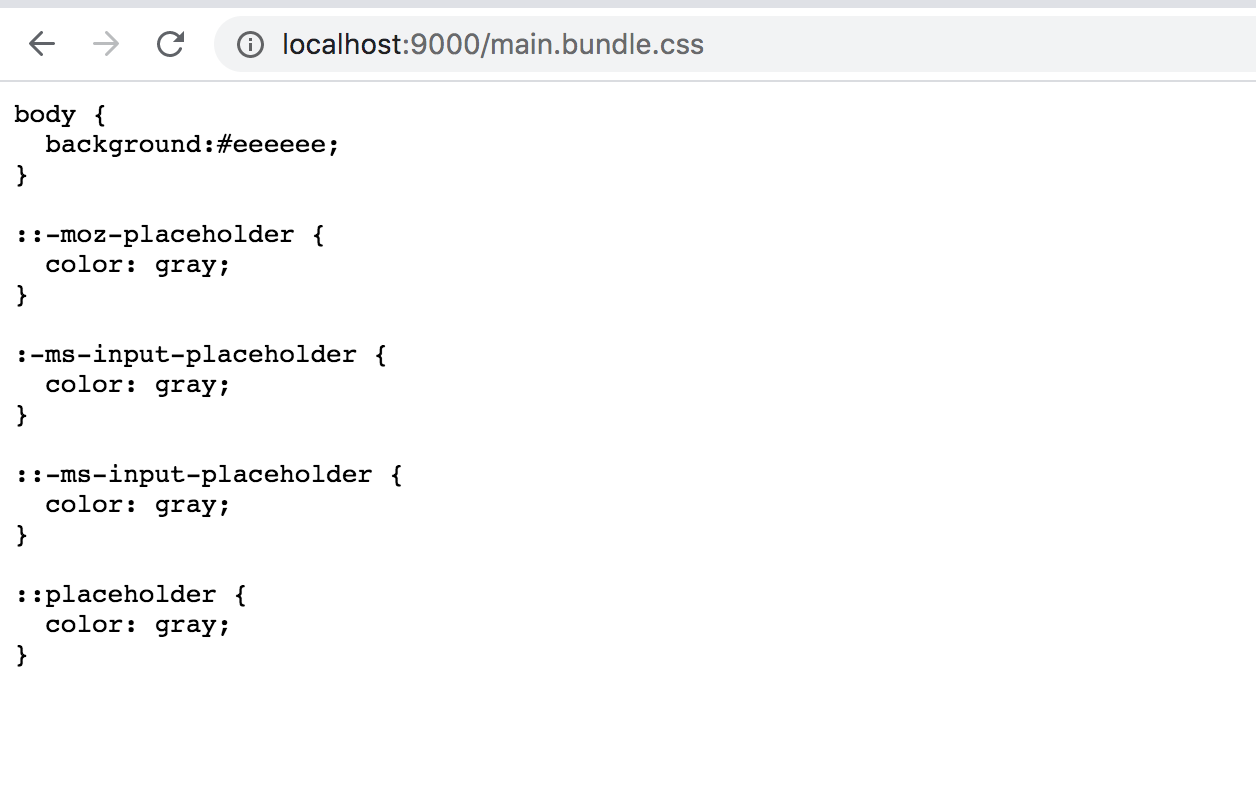
//...Notice how we changed the importLoaders option in our css-loader options configuration as well so that postcss-loader will be loaded before our css-loader. Our postcss-loader expects a configuration file postcss.config.js which is in the root of our project. Inside we can set some configuration options for our PostCSS. Let’s install the autoprefixer PostCSS plugin which automatically defines browser prefixes in our css styles. For example, if we have:
::placeholder {
  color: gray;
}

/** autoprefixer plugin will compile to: **/
::-webkit-input-placeholder {
  color: gray;
}
::-moz-placeholder {
  color: gray;
}
:-ms-input-placeholder {
  color: gray;
}
::-ms-input-placeholder {
  color: gray;
}
::placeholder {
  color: gray;
}
The PostCSS autoprefixer plugin will add the browser (vendor) specific prefixes to our css so we don’t have write every prefix. This is also helpful for animations, media queries and many other browser specific styles.
Let’s install the autoprefixer plugin:
npm install autoprefixerAnd inside our postcss.config.js we can add our autoprefixer plugin:
module.exports = {
  plugins: [
    require('autoprefixer')
  ]
}
Finally, let’s open our global index.css file inside our src directory and add some styles that need to be autoprefixed:
body {
  background:#eeeeee;
}

::placeholder {
  color: gray;
}
We can restart our development server by running npm run develop and once our webpack is done compiling we can navigate to our main.bundle.css file located at http://localhost:9000/main.bundle.css and you can see we have our PostCSS working with the autoprefixer plugin working as expected!
With PostCSS installed you have opened the door to a lot of css processing power that you wouldn’t otherwise have. For instance, you can use the postcss-nested plugin to write nested styles like you would see in sass or less files. You can also use our favorite CSS utility library Tailwind CSS as a CSS framework for your project!
Adding ESLint to your JavaScript and JSX files for React
ESLint is a JavaScript linter that analyzes your code for problems and make sure that your code has consistency and conforms to a style guide used by other developers throughout your project. The best part? Many problems ESLint finds can be automatically fixed! Setting up ESLint in our Webpack bundle is easy. First, we’ll need to install the eslint-loader which will be used on our .js and/or .jsx files to make sure our file syntax conforms to the style guides. Install eslint-loader with:
npm i eslint-loaderand install babel-eslint parser as a dev dependency:
npm i --save-dev babel-eslintInstead of rolling our own configuration for eslint we’re going to use a the configuration provided by Airbnb eslint-config-airbnb by running the npx utility to install all of our peer dependencies we’ll need for eslint. In your project root run:
npx install-peerdeps --dev eslint-config-airbnbOnce all of the peer dependencies are installed we can take a peek at our package.json file to see all that was installed:
  "devDependencies": {
    "eslint": "^6.8.0",
    "eslint-config-airbnb": "^18.1.0",
    "eslint-plugin-import": "^2.21.2",
    "eslint-plugin-jsx-a11y": "^6.2.3",
    "eslint-plugin-react": "^7.20.0",
    "eslint-plugin-react-hooks": "^2.5.0",
    //...
  }
Now we will need to create a .eslintrc file in our root directory to configure our eslint parser:
{
  "parser": "babel-eslint",
  "extends": ["airbnb"],
  "rules": {
    "react/jsx-filename-extension": [1, { "extensions": [".js", ".jsx"] }]
  }
}
Under our "rules" property we’re going to add a react specific rule that extends our jsx rules to .js files as well as .jsx since we’re writing our react components in .js files.
Lastly, we’ll need to add our eslint-loader configuration to our webpack.config.js file:
      //...
      rules: [
        {
          test: /\.(jsx|js)$/,
          include: path.resolve(__dirname, 'src'),
          exclude: /node_modules/,
          use: [{
            loader: 'babel-loader',
            options: {
              presets: [
                ['@babel/preset-env', {
                  "targets": "defaults"
                }],
                '@babel/preset-react'
              ]
            }
          }, {
            loader: 'eslint-loader',
            options: {
              fix: true
            }
          }]
        }
        //...
We’re adding the options: { fix: true } to our eslint-loader config which will auto-format our .js files for us to conform to the airbnb eslint style guide. ESLint fixes are syntax-aware so you won’t experience errors introduced by traditional find-and-replace algorithms. Upon saving the files, your .js files will be auto formatted to conform to the eslint style guide. With our eslint dependencies installed we can restart the webpack development server and you should see some eslint errors pop up in the console such as:
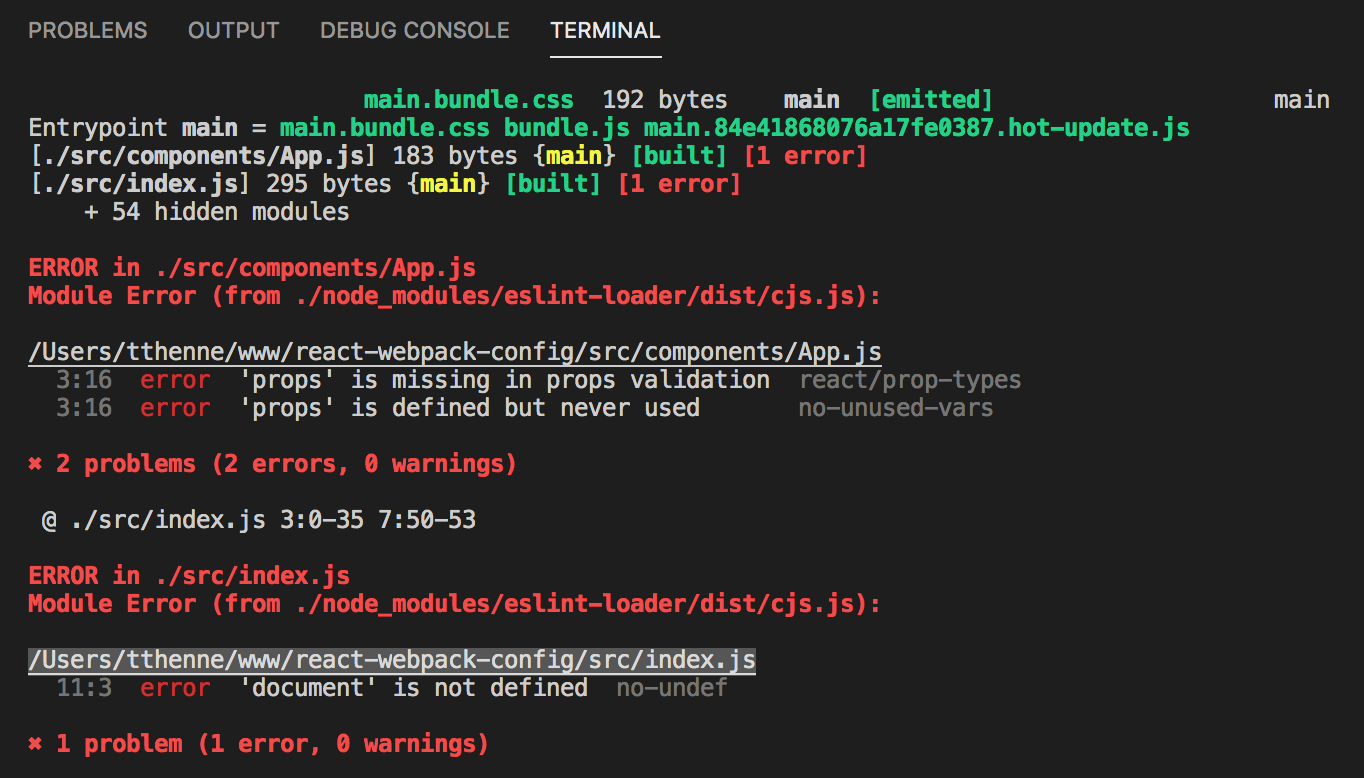
We can see the error 'props' is defined but never used and if we explore our App.js file we will see that indeed our props argument is defined but never used. We will also notice that there have been semicolons added to the end of our JavaScript lines which conforms to the airbnb eslint style guide and these were auto formatted for us! We can “ignore” or change our rules in the .eslintrc file by adding a line to our rules:
{
  "parser": "babel-eslint",
  "extends": ["airbnb"],
  "rules": {
    "react/jsx-filename-extension": [1, { "extensions": [".js", ".jsx"] }],
    "no-unused-vars": 0
  }
}
We are ignoring the rule for no-unused-vars by setting it to 0 so that style rule will not invoke an eslint error in any of our files. We can also do this on a file per file basis by leaving comments in the target file to specify that we want to ignore an eslint rule. Let’s add the /* eslint-disable no-undef */ to the top of our index.js file since document is defined in the browser so we shouldn’t need eslint to warn us about this undefined variable:
import React from 'react';
import ReactDOM from 'react-dom';
import App from './components/App';
import './index.css';

// Opt-in to Webpack hot module replacement
if (module.hot) module.hot.accept();

/* eslint-disable no-undef */
ReactDOM.render(
  <App />,
  document.getElementById('app'),
);
We can restart our development server and we should see that the errors are fixed for us by ignoring these rules!
We have completed our journey through the Webpack configuration for your React app. In this tutorial we walked through configuring Babel, setting up a Webpack Dev Server, using the MiniCssExtractPlugin along with PostCSS integration and finally we added ESLint JavaScript linter to conform to syntax guidelines. Hopefully this helps you in your next React application and you can use as a reference for further React development.