Building a Website with Gatsby and Strapi CMS
April 18th 2020
If you’ve read our article on JAMStack Technology you know we are a big proponent of the Headless CMS model. Two big players in the Headless CMS space are Strapi.io – a backend Headless Content Management System – and Gatsby.js – a front-end React framework for building blazing fast websites. If you put these two together you have a great technology stack for building websites and applications.
Today we will be discussing how to use Strapi as a Headless CMS and Gatsby as a front-end site generator to build a website.
Strapi Setup and Installation
First, we will start with our folder structure. We are going to create a project folder called strapi-gatsby and inside this folder we will be installing our two projects, our Strapi backend and Gatsby front end. First, we will install and setup Strapi.
In order to use Strapi locally we will need to setup a Mongo database and assign a user for our database. We can log into the mongo shell and run use strapi-gatsby to switch (and create our strapi-gatsby database). From there we can run the command:
db.createUser({ user: "gatsby", roles: [{ "role": "dbOwner", "db": "strapi-gatsby" }], pwd: "YOUR_PASSWORD" })Make sure you replace YOUR_PASSWORD with the password you choose for you database.
With the database created we can finish installing our strapi project. Inside our strapi-gatsby parent folder we can use the npx command to run and install our strapi installation:
npx create-strapi-app strapiWe’ll get prompt to choose the installation type and we can choose “Custom (manual settings)”. Then we will walk through the prompts to configure. We will choose “mongo” for our database of choice:
Choose your default database client mongo
Database name: strapi-gatsby
Host: 127.0.0.1
+srv connection: false
Port (It will be ignored if you enable +srv): 27017
Username: gatsby
Password: ****************
Authentication database (Maybe "admin" or blank): strapi-gatsby
Enable SSL connection: No
Once our project is done installing we can navigate into our strapi folder and run yarn develop to start our development server. Once the development server starts we can navigate to http://localhost:1337/admin to create our first user. You can fill in your account credentials to create your strapi administrator account.
While we are logged in we can create some content types for our website. In Strapi beta.19 and up we have access to Single Types content types which work perfect for unique pages of a website. We can also leverage Component content types for grouping fields together and creating repeatable field groups inside our Single Type pages.
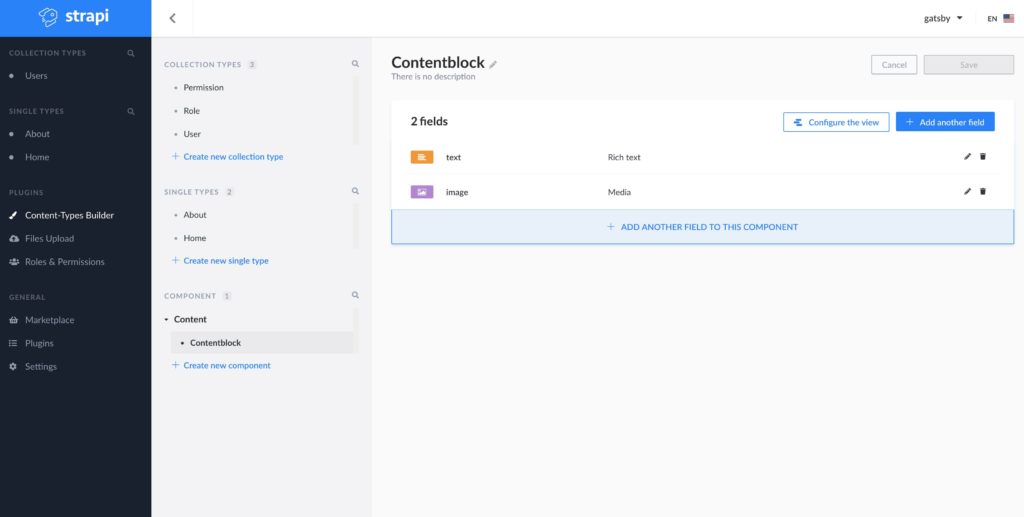
Let’s create a Component content type called Contentblock which will be composed of two sub-fields: text field and image field which will hold our text and image for each instance of contentblock we create. Navigate to the Content Types in the left hand sidebar and click “Create new component”. In the configuration modal we can enter the name as “contentblock” and under category we will create a new category called “content”. The category is used for searching through your components when associating a component field to another content type. Next we will create two fields inside our component. Our first field will be of type “Rich text” and we can name the field “text”. Our second sub-field for our component will be of “Media” and we can name this field “image”. Now we can save our component with the two sub-fields created so we can use it in our Single Type configuration.
Now we can create two content types that will represent two pages that we will be building out. Our Home page and an About page. Content types that are “Single Types” work perfectly for unique pages that aren’t going to be repeated in our project. First we can click on “Create new single type” and under Display Name in our configuration modal we can type Home. There is a unique identifier field (UID) that is generated for us and we can leave the UID field that is auto-generated for us. Now we can add our first field which will be of type “Text” and we can name this field title. We will also leave it as “Short text” field type. We can then add another field which we will add a field of type “Component”. On the component configuration screen we can select the second option “Use an existing component” and proceed to the next step. For the “Name” of the field we can call this field “content” since it will represent the content of our page. Under “Select a Component” we can select our contentblock component. We can leave the option under Type to be “Repeatable component” so we can create many instances of contentblocks within our page. Finally, we can click “Finish” and “Save” our new Single Type content type. The server should restart and you should see a new navigation link called Home in the left hand sidebar. Before we populate content for our Home page we can repeat the steps above for an About page single content type. Once, you have the two single types created we can navigate to each of the content types Home and About and populate the fields we defined. For now we can put dummy content into our contentblock fields and placeholder images just for testing. Once you’ve filled out the fields for each single type page we will need to navigate to our Roles & Permissions plugin: http://localhost:1337/admin/plugins/users-permissions/roles and click on “Public” and enable the find action for both About and Home controllers.
Now we can test that our api is serving our content by using Postman to run a GET request to http://localhost:1337/home and http://localhost:1337/about and you should see the content returned from the api:
{
    "_id": "5e9a08e19f2713dde27f1cd0",
    "title": "Gatsby Strapi",
    "content": [
        {
            "_id": "5e9a08e19f2713dde27f1cd1",
            "text": "Lorem ipsum dolor sit amet, consectetur adipiscing elit, sed do eiusmod tempor incididunt ut labore et dolore magna aliqua. Ut enim ad minim veniam, quis nostrud exercitation ullamco laboris nisi ut aliquip ex ea commodo consequat. Duis aute irure dolor in reprehenderit in voluptate velit esse cillum dolore eu fugiat nulla pariatur. Excepteur sint occaecat cupidatat non proident, sunt in culpa qui officia deserunt mollit anim id est laborum.",
            "createdAt": "2020-04-17T19:52:01.248Z",
            "updatedAt": "2020-04-17T19:52:30.492Z",
            "__v": 0,
            "image": {
                "_id": "5e9a08e19f2713dde27f1cd3",
                "name": "Converdia-Mock.jpg",
                "sha256": "y4pnuRR8pC0w4oEoCiNTFLLbddUfxd224kcGVj9nZTs",
                "hash": "caaad50950344cceaf329f87f9d35ba7",
                "ext": ".jpg",
                "mime": "image/jpeg",
                "size": 59.81,
                "url": "/uploads/caaad50950344cceaf329f87f9d35ba7.jpg",
                "provider": "local",
                "related": [
                    "5e9a08e19f2713dde27f1cd1"
                ],
                "createdAt": "2020-04-17T19:52:01.289Z",
                "updatedAt": "2020-04-17T19:52:01.316Z",
                "__v": 1,
                "id": "5e9a08e19f2713dde27f1cd3"
            },
            "id": "5e9a08e19f2713dde27f1cd1"
        }
    ],
    "createdAt": "2020-04-17T19:52:01.245Z",
    "updatedAt": "2020-04-17T19:52:30.508Z",
    "__v": 1,
    "id": "5e9a08e19f2713dde27f1cd0"
}
With Strapi setup we can turn our attention to our Gatsby setup and installation.
Gatsby Setup and Installation
We can use npx in the same way to install our Gatsby site as we did with our Strapi installation. Navigate to our project directory strapi-gatsby and run the command:
npx gatsby new gatsbyWe’re creating a new gatsby site using npx and we’re creating a folder gatsby to store our project. Once it finishes installing we can navigate into our gatsby folder and run yarn develop to make sure the development server is running.
Since we’ll be integrating our Gatsby project into Strapi we will need to source our data from our Strapi installation. Data in Gatsby sites can come from anywhere: APIs, databases, CMSs, local files, etc. We can source data and pull it into the GraphQL layer for access later in pageQueries or staticQueries in our components.
Source plugins fetch data from their source. E.g. the filesystem source plugin knows how to fetch data from the file system. The WordPress plugin knows how to fetch data from the WordPress API
https://www.gatsbyjs.org/
Fortunately, in our case we don’t have to develop a source plugin as that has already been done for use by the Strapi community. The gatsby-source-strapi plugin sources data from our Strapi project to pull into our Gatsby GraphQL layer. We can install the plugin in our gatsby project. We can navigate to our gatsby project folder and install the source plugin:
yarn add gatsby-source-strapiOnce that is done installing we can setup the configuration for our gatsby-source-strapi. In order to configure the plugin we can edit the gatsby-config.js found in our gatsby client directory. We will be adding the plugin gatsby-source-strapi to our plugin array and defining some options:
require("dotenv").config({
  path: `.env.${process.env.NODE_ENV}`,
});

module.exports = {
...
plugins: [
  {
    resolve: `gatsby-source-strapi`,
    options: {
      apiURL: process.env.API_URL || `http://localhost:1337`,
      queryLimit: 1000,
      singleTypes: [`home`, `about`]
    },
  },
],
...
}
First we’re using the dotenv package to load our environment variable. Before we forget, let’s create a file .env.development in our project directory and add our API_URL variable to the file:
API_URL="http://localhost:1337"In our gatsby-source-strapi plugin configuration we are adding our apiURL which is where our local strapi installation is running, we’re also including the singleTypes of home and about which we created in our Strapi admin dashboard. This will pull those two pages into our GraphQL data layer so that we can access them through a GraphQL query. Let’s restart our Gatsby development server and we can navigate to: http://localhost:8000/___graphql to run our GraphiQL explorer. We can run a query to show that we have the expected data inside our GraphQL layer:
query getPages {
  strapiHome {
    strapiId
    title
    content {
      text
      image {
        publicURL
      }
    }
  }
}
You should see the returned dummy data that we defined in our Strapi admin dashboard:
{
  "data": {
    "strapiHome": {
      "strapiId": "5e9a08e19f2713dde27f1cd0",
      "title": "Gatsby Strapi",
      "content": [
        {
          "text": "Lorem ipsum dolor sit amet, consectetur adipiscing elit, sed do eiusmod tempor incididunt ut labore et dolore magna aliqua. Ut enim ad minim veniam, quis nostrud exercitation ullamco laboris nisi ut aliquip ex ea commodo consequat. Duis aute irure dolor in reprehenderit in voluptate velit esse cillum dolore eu fugiat nulla pariatur. Excepteur sint occaecat cupidatat non proident, sunt in culpa qui officia deserunt mollit anim id est laborum.",
          "image": {
            "publicURL": "/static/02ca4112f8e1cd561b5deb656caadcd5/8aec4fba4b1a08975404cfe0abf0187a.jpg"
          }
        }
      ]
    }
  }
}
What’s nice is that our image assets actually got pulled into our Gatsby public directory so they will be served from our Gatsby project as opposed to making a request to the Strapi server to get the resources! We are ready to pull the data into our pages. To do that we can turn to Gatsby’s page query to get our data inside our pages.
Gatsby Page Query for GraphQL Content
We have seen how we can import our Strapi content into our GraphQL data layer for our Gatsby project, but now we need to include that data into the respective page. Since we know that we are creating a page for home and about single content types, we can reflect the structure of that in our Gatsby project. By default, any component defined in gatsby/src/pages directory will automatically have a route and use the component exported in the file:
Gatsby core automatically turns React components in
https://www.gatsbyjs.org/docs/creating-and-modifying-pages/src/pagesinto pages
To reflect our project structure we can edit the file found in gatsby/src/pages/index.js as that will become the home page for our site. Inside we will need to define a GraphQL query which when resolved, the data will be passed in as a prop to our component. Let’s take a look at the index.js file and import the grapql package and define our page query for our component:
import React from "react"
import { graphql, Link } from "gatsby"

import Layout from "../components/layout"
import Image from "../components/image"
import SEO from "../components/seo"

const HomePage = () => (
...
)

export const query = graphql`
  query HomePageQuery {
    strapiHome {
      title
      strapiId
      content {
        text
        image {
          publicURL
        }
      }
      createdAt
    }
  }
`

export default IndexPage
We’ve essentially copied over our GraphQL query from our GraphiQL explorer and defined a query variable that we are exporting. Gatsby will look for any exported graphql tagged query and resolve the query and inject the data as a prop to our IndexPage component.
Below the
https://www.gatsbyjs.org/docs/page-query/HomePagecomponent declaration, export a new constant calledquery. The name of the constant isn’t important, as Gatsby looks for an exportedgraphqlstring from the file rather than a specific variable. Note that you can only have one page query per file.
Now inside our HomePage component we are able to destructure our data variable to get the strapiHome data that was made available in our GraphQL data layer from the gatsby-source-strapi plugin.
import React from "react"
import { graphql, Link } from "gatsby"

import Layout from "../components/layout"
import Image from "../components/image"
import SEO from "../components/seo"

const HomePage = ({ data: { strapiHome }}) => (
  <Layout>
    <SEO title="Home" />
    <h1>{ strapiHome.title }</h1>
    { strapiHome.content.map(contentblock => (
      <>
        <p>{ contentblock.text }</p>
        <img src={contentblock.image.publicURL} alt={strapiHome.title} />
      </>
    ))}
    <div style={{ maxWidth: `300px`, marginBottom: `1.45rem` }}>
      <Image />
    </div>
    <Link to="/page-2/">Go to page 2</Link>
  </Layout>
)

export const query = graphql`
  query HomePageQuery {
    strapiHome {
      title
      strapiId
      content {
        text
        image {
          publicURL
        }
      }
      createdAt
    }
  }
`

export default IndexPage
Since the strapiHome.content is an array of component content types (which we defined in Strapi dashboard) we can loop through all of the contentblocks that we defined and display the contentblock.text and the contentblock.image. That way if you create other content blocks for our home page those will be displayed on the Gatsby home page as well.
We won’t get into theming your Gatsby project in this tutorial but if you are looking for a great UI library we recommend Tailwind CSS and we even have a tutorial on how to setup Tailwind CSS for a Gatsby Project that you can follow to get Tailwind up and running inside your Gatsby site.
To finish off the tutorial you can practice creating the About page in your Gatsby project using the same mechanisms that we used for the Home page. You will need to create a page at gatsby/src/pages/about.js and make sure that you use the correct GraphQL query to pull in your strapiAbout data into your component. You can repeat this as many times as you need for other pages for your project, but be sure to create the Single Type content page in your Strapi dashboard first before creating the correlating page in your Gatsby site.
In the next tutorial we’ll discuss creating dynamic pages programmatically in Gatsby using a Strapi Collection content type to replicate a “blog” functionality for our project. Until next time, stay curious, stay creative.